Service Manuals, User Guides, Schematic Diagrams or docs for : . Car Manuals Acura 3.5RL 1996-2004 Approved srm RL9604S04006A
<< Back | HomeMost service manuals and schematics are PDF files, so You will need Adobre Acrobat Reader to view : Acrobat Download Some of the files are DjVu format. Readers and resources available here : DjVu Resources
For the compressed files, most common are zip and rar. Please, extract files with Your favorite compression software ( WinZip, WinRAR ... ) before viewing. If a document has multiple parts, You should download all, before extracting.
Good luck. Repair on Your own risk. Make sure You know what You are doing.
Image preview - the first page of the document

>> Download RL9604S04006A documenatation <<
Text preview - extract from the document
Main Menu   Table of Contents

                                Starting System
                                 Starter Replacement
                                 1.   Make sure you have the anti-theft code for the radio,
                                      then write down the frequencies for the radio's pre-
                                      set buttons.

                                 2.    Disconnect the battery negative terminal first, then
                                      the positive terminal.

                                      NOTE: The PCM memory setting is needed after
                                      reconnecting the battery (see page 11-123).

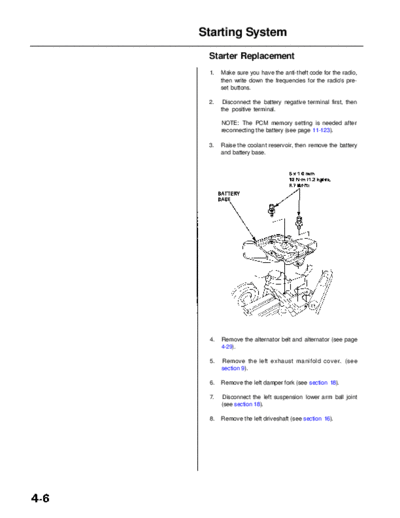
                                 3.   Raise the coolant reservoir, then remove the battery
                                      and battery base.


                                 4.   Remove the alternator belt and alternator (see page
                                      4-29).

                                 5.   Remove the left exhaust manifold cover. (see
                                      section 9).

                                 6.   Remove the left damper fork (see section 18).

                                 7.   Disconnect the left suspension lower arm ball joint
                                      (see section 18).

                                 8.   Remove the left driveshaft (see section 16).
              Main Menu                     Table of Contents


9. Remove the transmission stop collar, then remove                    13. Disconnect the starter cable and BLK/WHT wire, then
   the exhaust pipe A.                                                     remove the starter.

                SELF-LOCKING NUT
                8 x 1.25 mm
                22 N-m (2.2 kgf-m, 16 Ibf-ft)
                Replace.                                              8 x 1.25 mm
                                                       GASKETS                                                10 x 1.25 mm
                                                                      8.8 N-m (0.9 kgf-m,
                                                       Replace.       6.5 Ibf-ft)               STARTER       44 N-m (4.5 kgf-m, 33 Ibf-ft)
                                                                                                CABLE


 GASKET
 Replace.


 EXHAUST
 PIPE A
                                                SELF-LOCKING NUT
                                                10 x 1.25 mm
 SELF-LOCKING NUT                               54 N-m (5.5 kgf-m,
 10 x 1.25 mm                                                          BLK/WHT
                                                40 Ibf-ft)
 54 N-m (5.5 kgf-m,                             Replace.               WIRE
 40 Ibf-ft)
                                                                                  10 x 1.25 mm                         STARTER
 Replace.
                                           TRANSMISSION STOP                      44 N-m (4.5 kgf-m, 33 Ibf-ft)
                    10 x 1.25 mm           COLLAR
                    38 N-m (3.9 kgf-m,
                    28 Ibf-ft)
                                                                       14. Install in the reverse order of removal.
10. Remove the front mount mounting bolts (see
    section 5).                                                             NOTE: When installing the starter cable, make sure
                                                                            that the crimped side of the ring terminal is facing
11. Attach the chain hoist to the engine (see section 5).                   out.

12. Remove the left engine mount bracket.

                                                                                            Crimped side of ring       NUT
             12 x 1.25 mm                                                                   terminal
             54 N-m (5.5 kgf-m,                  12 x 1.25 mm
             40 Ibf-ft)                          64 N-m (6.5 kgf-m,
                                                 47 Ibf-ft)


                                                                                                                      TERMINAL


                                                  LEFT ENGINE
                                                  MOUNT BRACKET


                             12 x 1.25 mm                               15. Enter the anti-theft code for the radio, then enter the
                             54 N-m (5.5 kgf-m, 40 Ibf-ft)                  customer's radio station presets.
◦ Jabse Service Manual Search 2024 ◦ Jabse Pravopis ◦ onTap.bg ◦ Other service manual resources online : Fixya ◦ eServiceinfo