Service Manuals, User Guides, Schematic Diagrams or docs for : . Car Manuals Acura 3.5RL 1996-2004 Approved srm RL9604S07024A
<< Back | HomeMost service manuals and schematics are PDF files, so You will need Adobre Acrobat Reader to view : Acrobat Download Some of the files are DjVu format. Readers and resources available here : DjVu Resources
For the compressed files, most common are zip and rar. Please, extract files with Your favorite compression software ( WinZip, WinRAR ... ) before viewing. If a document has multiple parts, You should download all, before extracting.
Good luck. Repair on Your own risk. Make sure You know what You are doing.
Image preview - the first page of the document
>> Download RL9604S07024A documenatation <<
Text preview - extract from the document
Main Menu Table of Contents
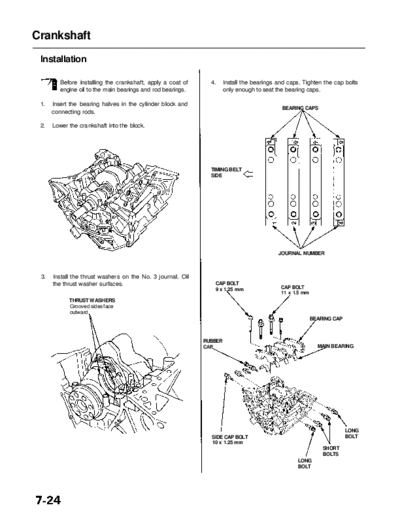
Crankshaft
Installation
Before installing the crankshaft, apply a coat of 4. Install the bearings and caps. Tighten the cap bolts
engine oil to the main bearings and rod bearings. only enough to seat the bearing caps.
1. Insert the bearing halves in the cylinder block and
BEARING CAPS
connecting rods.
2. Lower the crankshaft into the block.
TIMING BELT
SIDE
JOURNAL NUMBER
3. Install the thrust washers on the No. 3 journal. Oil
the thrust washer surfaces. CAP BOLT
9 x 1.25 mm CAP BOLT
11 x 1.5 mm
THRUST WASHERS
Grooved sides face
outward.
BEARING CAP
RUBBER
CAP MAIN BEARING
LONG
SIDE CAP BOLT BOLT
10 x 1.25 mm
SHORT
BOLTS
LONG
BOLT
Main Menu Table of Contents
5. Install the piston/connecting rod assemblies (see 7. Tighten the 9 x 1.25 mm cap bolts to the specified
page 7-23). torque.
6. Check the connecting rod bearing clearance with Torque: 39 N-m (4.0 kgf-m, 29 Ibf-ft)
plastigage (see page 7-9), then torque the connect- Apply engine oil to the bolt threads.
ing rod cap nuts.
8. Tighten the 11 x 1.5 mm cap bolts to the specified
NOTE: Reference numbers on the connecting rods torque.
are for big-end bore tolerance and do NOT indicate
the position of the piston in the engine. Torque: 76 N-m (7.8 kgf-m, 56 Ibf-ft)
Apply engine oil to the bolt threads.
9. Tighten the 10 x 1.25 mm cap side bolts to the spec-
9 x 0.75 mm
ified torque.
44 N-m (4.5 kgf-m,
33 Ibf-ft)
Apply engine oil to the Torque: 49 N-m (5.0 kgf-m, 36 Ibf-ft)
nut threads.
9 x 1.25 mm 11 x 1.5 mm
39 N-m (4.0 kgf-m, 76 N-m (7.8 kgf-m,
29 Ibf-ft) 56 Ibf-ft)
10 x 1.25 mm
49 N-m (5.0 kgf-m,
36 Ibf-ft)
BEARING CAP BOLTS TORQUE SEQUENCE
THRUST WASHERS
Line up the mark when
installing the connecting
rod cap.
CAUTION: Whenever any crankshaft bearing or con-
necting rod bearing is replaced, it is necessary after
reassembly to run the engine at idling speed until it
reaches normal operating temperature, then continue
to run it for approximately 15 minutes.
(cont'd)
Main Menu Table of Contents
Crankshaft
Installation (cont'd)
10. Apply liquid gasket to the cylinder block mating sur- NOTE:
face of the rear cover, then install the cover on the ◦ Jabse Service Manual Search 2026 ◦ Jabse Pravopis ◦ onTap.bg ◦ Other service manual resources online : Fixya ◦ eServiceinfo