Service Manuals, User Guides, Schematic Diagrams or docs for : . Car Manuals Acura 3.5RL 1996-2004 Approved srm RL9604S11150A
<< Back | HomeMost service manuals and schematics are PDF files, so You will need Adobre Acrobat Reader to view : Acrobat Download Some of the files are DjVu format. Readers and resources available here : DjVu Resources
For the compressed files, most common are zip and rar. Please, extract files with Your favorite compression software ( WinZip, WinRAR ... ) before viewing. If a document has multiple parts, You should download all, before extracting.
Good luck. Repair on Your own risk. Make sure You know what You are doing.
Image preview - the first page of the document
>> Download RL9604S11150A documenatation <<
Text preview - extract from the document
             Main Menu                  Table of Contents


Fuel Supply System
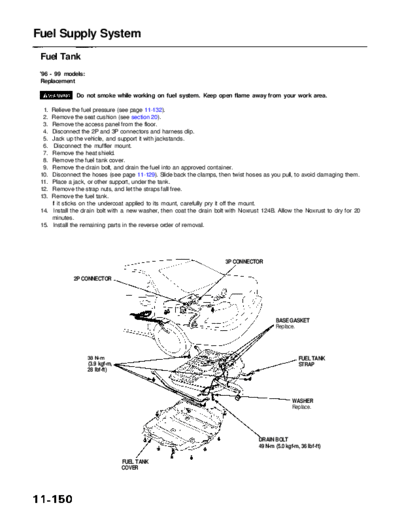
 Fuel Tank
 '96 - 99 models:
 Replacement

              Do not smoke while working on fuel system. Keep open flame away from your work area.

  1. Relieve the fuel pressure (see page 11-132).
  2. Remove the seat cushion (see section 20).
  3. Remove the access panel from the floor.
  4. Disconnect the 2P and 3P connectors and harness clip.
  5. Jack up the vehicle, and support it with jackstands.
  6.  Disconnect the muffler mount.
  7. Remove the heat shield.
  8. Remove the fuel tank cover.
  9. Remove the drain bolt, and drain the fuel into an approved container.
 10. Disconnect the hoses (see page 11-129). Slide back the clamps, then twist hoses as you pull, to avoid damaging them.
 11. Place a jack, or other support, under the tank.
 12. Remove the strap nuts, and let the straps fall free.
 13. Remove the fuel tank.
     If it sticks on the undercoat applied to its mount, carefully pry it off the mount.
 14. Install the drain bolt with a new washer, then coat the drain bolt with Noxrust 124B. Allow the Noxrust to dry for 20
     minutes.
 15. Install the remaining parts in the reverse order of removal.


                                                                      3P CONNECTOR

             2P CONNECTOR


                                                                                          BASE GASKET
                                                                                          Replace.


                    38 N-m                                                                           FUEL TANK
                    (3.9 kgf-m,                                                                      STRAP
                    28 Ibf-ft)


                                                                                                  WASHER
                                                                                                  Replace.


                                                                                   DRAIN BOLT
                                                                                   49 N-m (5.0 kgf-m, 36 Ibf-ft)

                                  FUEL TANK
                                  COVER
            Main Menu                    Table of Contents


'00 - 01 models:
Replacement

             Do not smoke while working on fuel system. Keep open flame away from your work area.

 1. Relieve the fuel pressure (see page 11-132).
 2. Remove the seat cushion (see section 20).
 3. Disconnect the 10P connector from the fuel unit wire harness.
 4. Remove the access panel from the floor.
 5. Disconnect the 2P and 3P connectors and harness clip.
 6. Remove the Fuel Tank vapor recirculation valve mounting bolt and Fuel Tank vapor recirculation valve.
 7. Remove the Vapor signal tube from the clips.
 8.  Remove the fuel unit wire harness from the access panel, and pass the Fuel Tank signal tube.
 9. Jack up the vehicle, and support it with jackstands.
10.  Disconnect the muffler mount.
11. Remove the heat shield.
12. Remove the fuel tank covers.
13. Remove the drain bolt, and drain the fuel into an approved container.
14. Disconnect the hoses (see page 11-129). Slide back the clamps, then twist hoses as you pull, to avoid damaging them.
15. Place a jack, or other support, under the tank.
16. Remove the strap nuts, and let the straps fall free.
17. Remove the fuel tank.
    If it sticks on the undercoat applied to its mount, carefully pry it off the mount.
18. Install the drain bolt with a new washer, then coat the drain bolt with Noxrust 124B. Allow the Noxrust to dry for 20
    minutes.
19. Install the remaining parts in the reverse order of removal.


                                                                                FUEL UNIT
                        ACCESS                                                  WIRE HARNESS
                        PANEL
                                                                                        10P CONNECTOR

               3P CONNECTOR
                                                                                        2P CONNECTOR


                                                                                        FUEL TANK VAPOR
                                                                                        RECIRCULATION
                                                                                        VALVE
                           38 N-m
                           (3.9 kgf-m,
                           28 Ibf-ft)
                                                                                              FUEL TANK
                                                                                              STRAP


                                                                                        WASHER
                          FUEL TANK                                                     Replace.
                          COVERS
                                                                                        DRAIN BOLT
                                                                                        49 N-m (5.0 kgf-m, 36 Ibf-ft)


                                                                                           CLIPS


                                                                                    FUEL TANK VAPOR SIGNAL
                                                             WIRE HARNESS           TUBE
◦ Jabse Service Manual Search 2026 ◦ Jabse Pravopis ◦ onTap.bg ◦ Other service manual resources online : Fixya ◦ eServiceinfo