Service Manuals, User Guides, Schematic Diagrams or docs for : . Car Manuals Acura 3.5RL 1996-2004 Approved srm RL9604S14112A
<< Back | HomeMost service manuals and schematics are PDF files, so You will need Adobre Acrobat Reader to view : Acrobat Download Some of the files are DjVu format. Readers and resources available here : DjVu Resources
For the compressed files, most common are zip and rar. Please, extract files with Your favorite compression software ( WinZip, WinRAR ... ) before viewing. If a document has multiple parts, You should download all, before extracting.
Good luck. Repair on Your own risk. Make sure You know what You are doing.
Image preview - the first page of the document
>> Download RL9604S14112A documenatation <<
Text preview - extract from the document
Main Menu Table of Contents
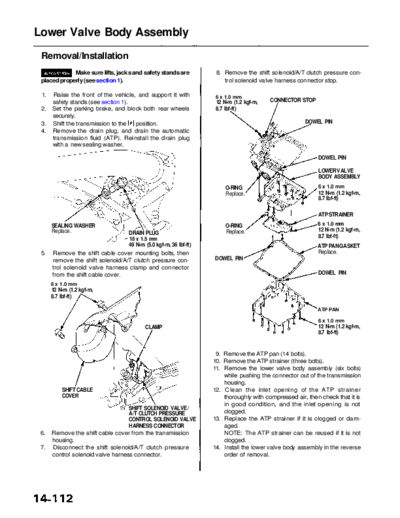
Lower Valve Body Assembly
Removal/Installation
Make sure lifts, jacks and safety stands are 8. Remove the shift solenoid/A/T clutch pressure con-
placed properly (see section 1). trol solenoid valve harness connector stop.
1. Raise the front of the vehicle, and support it with 6 x 1.0 mm
safety stands (see section 1). 12 N-m (1.2 kgf-m, CONNECTOR STOP
2. Set the parking brake, and block both rear wheels 8.7 Ibf-ft)
securely.
3. Shift the transmission to the position. DOWEL PIN
4. Remove the drain plug, and drain the automatic
transmission fluid (ATP). Reinstall the drain plug
with a new sealing washer.
DOWEL PIN
LOWER VALVE
BODY ASSEMBLY
O-RING 6 x 1.0 mm
Replace. 12 N-m (1.2 kgf-m,
8.7 Ibf-ft)
ATP STRAINER
SEALING WASHER O-RING 6 x 1.0 mm
Replace. Replace. 12 N-m (1.2 kgf-m,
DRAIN PLUG
8.7 Ibf-ft)
18 x 1.5 mm
49 N-m (5.0 kgf-m, 36 Ibf-ft) ATP PAN GASKET
5. Remove the shift cable cover mounting bolts, then Replace.
remove the shift solenoid/A/T clutch pressure con- DOWEL PIN
trol solenoid valve harness clamp and connector
from the shift cable cover. DOWEL PIN
6 x 1.0 mm
12 N-m (1.2 kgf-m,
8.7 Ibf-ft)
ATP PAN
6 x 1.0 mm
CLAMP 12 N-m (1.2 kgf-m,
8.7 Ibf-ft)
9. Remove the ATP pan (14 bolts).
10. Remove the ATP strainer (three bolts).
11. Remove the lower valve body assembly (six bolts)
while pushing the connector out of the transmission
housing.
SHIFT CABLE 12. Clean the inlet opening of the ATP strainer
COVER thoroughly with compressed air, then check that it is
in good condition, and the inlet opening is not
SHIFT SOLENOID VALVE/
A/T CLUTCH PRESSURE clogged.
CONTROL SOLENOID VALVE 13. Replace the ATP strainer if it is clogged or dam-
HARNESS CONNECTOR aged.
6. Remove the shift cable cover from the transmission NOTE: The ATP strainer can be reused if it is not
housing. clogged.
7. Disconnect the shift solenoid/A/T clutch pressure 14. Install the lower valve body assembly in the reverse
control solenoid valve harness connector. order of removal.
◦ Jabse Service Manual Search 2026 ◦ Jabse Pravopis ◦ onTap.bg ◦ Other service manual resources online : Fixya ◦ eServiceinfo