Service Manuals, User Guides, Schematic Diagrams or docs for : . Car Manuals Acura 3.5RL 1996-2004 Approved srm RL9604S19017A
<< Back | HomeMost service manuals and schematics are PDF files, so You will need Adobre Acrobat Reader to view : Acrobat Download Some of the files are DjVu format. Readers and resources available here : DjVu Resources
For the compressed files, most common are zip and rar. Please, extract files with Your favorite compression software ( WinZip, WinRAR ... ) before viewing. If a document has multiple parts, You should download all, before extracting.
Good luck. Repair on Your own risk. Make sure You know what You are doing.
Image preview - the first page of the document
>> Download RL9604S19017A documenatation <<
Text preview - extract from the document
               Main Menu                    Table of Contents


Rear Brake Pads
 Inspection and Replacement
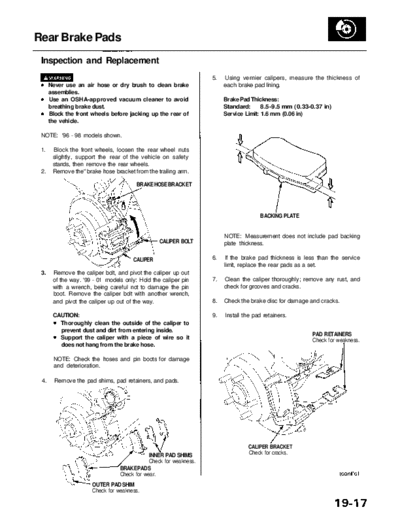
                                                                   5.   Using vernier calipers, measure the thickness of
      Never use an air hose or dry brush to clean brake                 each brake pad lining.
      assemblies.
      Use an OSHA-approved vacuum cleaner to avoid                      Brake Pad Thickness:
      breathing brake dust.                                             Standard:      8.5-9.5 mm (0.33-0.37 in)
      Block the front wheels before jacking up the rear of              Service Limit: 1.6 mm (0.06 in)
      the vehicle.

 NOTE: '96 - 98 models shown.

 1.    Block the front wheels, loosen the rear wheel nuts
       slightly, support the rear of the vehicle on safety
       stands, then remove the rear wheels.
 2.    Remove the" brake hose bracket from the trailing arm.

                                        BRAKE HOSE BRACKET


                                                                                      BACKING PLATE


                                                                        NOTE: Measurement does not include pad backing
                                                   CALIPER BOLT         plate thickness.

                                      CALIPER                      6.   If the brake pad thickness is less than the service
                                                                        limit, replace the rear pads as a set.
 3.    Remove the caliper bolt, and pivot the caliper up out
       of the way. '99 - 01 models only: Hold the caliper pin      7.   Clean the caliper thoroughly; remove any rust, and
       with a wrench, being careful not to damage the pin               check for grooves and cracks.
       boot. Remove the caliper bolt with another wrench,
       and pivot the caliper up out of the way.                    8.   Check the brake disc for damage and cracks.

       CAUTION:                                                    9.   Install the pad retainers.
         Thoroughly clean the outside of the caliper to
         prevent dust and dirt from entering inside.
                                                                                                         PAD RETAINERS
         Support the caliper with a piece of wire so it                                                  Check for weakness.
         does not hang from the brake hose.

       NOTE: Check the hoses and pin boots for damage
       and deterioration.

 4.     Remove the pad shims, pad retainers, and pads.


                                                                                 CALIPER BRACKET
                                             INNER PAD SHIMS                     Check for cracks.
                                             Check for weakness.
                                 BRAKE PADS
                                 Check for wear.
                      OUTER PAD SHIM
                      Check for weakness.
                Main Menu                   Table of Contents


Rear Brake Pads
 Inspection and Replacement (cont'd)
 10. Apply grease to the points indicated by the arrows         12. Push in the piston so that the caliper will fit over the
     in the following illustration:                                 pads. Make sure the piston boot is in position to
                                                                    prevent damaging it when pivoting the caliper
        Piston end and inner shim B contact surface                 down.
        Inner shim A contact surface (both sides)
        Pads and caliper bracket contact surface                13. Pivot the caliper down into position, then install the
        Outer pad and caliper body contact surface                  caliper bolt and tighten it. '99 - 01 models only: Hold
        Outer pad shim and outer pad contact surface                the caliper pin with a wrench, being careful not to
        Outer pad shim and caliper body contact surface             damage the pin boot. Install the caliper bolt with
                                                                    another wrench, and torque the caliper bolt to the
     NOTE: Use the pad grease included in the pad set               proper specification.
     or Molykote M77 grease, and apply a thin coat of
     grease evenly to the designated points.                        CAUTION: Be careful not damage the pin boot
                                                                    when pivoting the caliper down.
                       PISTON

                                    Apply Molykote M77                          CALIPER BOLT
                                    to both sides of shims.                     23 N-m (2.3 kgf-m, 17 Ibf-ft)
                                                                                                                 PISTON
                                                INNER SHIM B


                                                INNER SHIM A


                                WEAR INDICATOR
                                Install inner pad with its
                                wear indicator downward.
                BRAKE PADS

     OUTER PAD SHIM                                             14. Install the brake hose bracket on the trailing arm.
     Apply Molykote M77
     to both sides of shim.
                                                                    NOTE: Inspect the brake hose for interference and
                                                                    twisting.
 11. Install the brake pads and pad shims correctly.
                                                                15. Press the brake pedal several times to make sure
                                                                    the brakes work, then test-drive.
        When reusing the pads, always reinstall the
        brake pads in their original positions to prevent           NOTE: Engagement of the brake may require a
        loss of braking efficiency.                                 greater pedal stroke immediately after the brake
        Contaminated brake discs or pads reduce stop-               pads have been replaced as a set. Several applica-
        ping ability. Keep grease off the discs and pads.           tions of the brake pedal will restore the normal
                                                                    pedal stroke.
     NOTE: Install the pad with the wear indicator on
     the inside.                                                16. After installation, check for leaks at hose and line
                                                                    joints or connections, and retighten if necessary.
◦ Jabse Service Manual Search 2026 ◦ Jabse Pravopis ◦ onTap.bg ◦ Other service manual resources online : Fixya ◦ eServiceinfo