Service Manuals, User Guides, Schematic Diagrams or docs for : . Car Manuals Acura 3.5RL 1996-2004 Approved srm RL9604S20005A
<< Back | HomeMost service manuals and schematics are PDF files, so You will need Adobre Acrobat Reader to view : Acrobat Download Some of the files are DjVu format. Readers and resources available here : DjVu Resources
For the compressed files, most common are zip and rar. Please, extract files with Your favorite compression software ( WinZip, WinRAR ... ) before viewing. If a document has multiple parts, You should download all, before extracting.
Good luck. Repair on Your own risk. Make sure You know what You are doing.
Image preview - the first page of the document
>> Download RL9604S20005A documenatation <<
Text preview - extract from the document
Main Menu Table of Contents
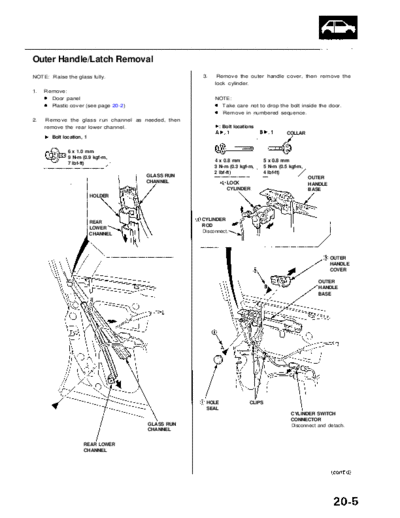
Outer Handle/Latch Removal
NOTE: Raise the glass fully. 3. Remove the outer handle cover, then remove the
lock cylinder.
1. Remove:
Door panel NOTE:
Plastic cover (see page 20-2) Take care not to drop the bolt inside the door.
Remove in numbered sequence.
2. Remove the glass run channel as needed, then
remove the rear lower channel. Bolt locations
COLLAR
Bolt location, 1
6 x 1.0 mm
9 N-m (0.9 kgf-m,
4 x 0.8 mm 5 x 0.8 mm
7 Ibf-ft)
3 N-m (0.3 kgf-m, 5 N-m (0.5 kgf-m,
2 Ibf-ft) 4 Ibf-ft)
GLASS RUN OUTER
CHANNEL LOCK HANDLE
CYLINDER BASE
HOLDER
REAR CYLINDER
LOWER ROD
CHANNEL Disconnect.
OUTER
HANDLE
COVER
OUTER
HANDLE
BASE
HOLE CLIPS
SEAL
CYLINDER SWITCH
CONNECTOR
GLASS RUN Disconnect and detach.
CHANNEL
REAR LOWER
CHANNEL
Main Menu Table of Contents
Doors
Outer Handle/Latch Removal (cont'd)
4. Remove the outer handle as shown. 6. Slide the outer handle base, and remove it from the
door. Disconnect the connector, detach the clips,
OUTER HANDLE
BASE LEVER then remove the latch with the outer handle base
through the hole in the door. Pry the outer handle
rod out from the outer handle base using diagonal
cutters.
NOTE:
To ease reassembly, note location of the outer
handle rod on the joint before disconnecting it.
Take care not to bend the rods.
OUTER
Screw locations
HANDLE
SEAT B
6 x 1.0 mm
5 N-m (0.5 kgf-m,
4 Ibf-ft)
Nut location, 1 OUTER HANDLE
ROD
DIAGONAL
CUTTERS
6 x 1.0 mm
8 N-m (0.8 kgf-m,
6 Ibf-ft)
JOINT
SEAT A BUSHING
Replace.
OUTER
HANDLE CYLINDER
ROD
LOCK
ROD OUTER
HANDLE
BASE
OUTER
HANDLE
ROD
SEAT B
CLIP
5. Remove the seat A, then loosen the bolt.
LATCH
CLIP
OUTER
CONNECTOR
HANDLE
BASE
7. Installation is the reverse of the removal procedure.
NOTE:
Make sure the glass run channel is installed
securely into the rear lower channel.
5 x 0.8 mm Make sure the door locks and opens properly.
SEAT A 5 N-m (0.5 kgf-m,
4 Ibf-ft)
Loosen.
◦ Jabse Service Manual Search 2026 ◦ Jabse Pravopis ◦ onTap.bg ◦ Other service manual resources online : Fixya ◦ eServiceinfo