Service Manuals, User Guides, Schematic Diagrams or docs for : . Car Manuals Acura 3.5RL 1996-2004 Approved srm RL9604S20023A
<< Back | HomeMost service manuals and schematics are PDF files, so You will need Adobre Acrobat Reader to view : Acrobat Download Some of the files are DjVu format. Readers and resources available here : DjVu Resources
For the compressed files, most common are zip and rar. Please, extract files with Your favorite compression software ( WinZip, WinRAR ... ) before viewing. If a document has multiple parts, You should download all, before extracting.
Good luck. Repair on Your own risk. Make sure You know what You are doing.
Image preview - the first page of the document
>> Download RL9604S20023A documenatation <<
Text preview - extract from the document
Main Menu Table of Contents
Installation
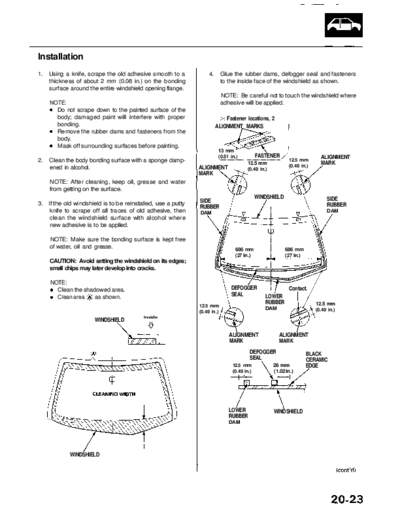
1. Using a knife, scrape the old adhesive smooth to a 4. Glue the rubber dams, defogger seal and fasteners
thickness of about 2 mm (0.08 in.) on the bonding to the inside face of the windshield as shown.
surface around the entire windshield opening flange.
NOTE: Be careful not to touch the windshield where
NOTE: adhesive will be applied.
Do not scrape down to the painted surface of the
body; damaged paint will interfere with proper Fastener locations, 2
bonding. ALIGNMENT MARKS I
Remove the rubber dams and fasteners from the
body.
Mask off surrounding surfaces before painting.
13 mm
(0.51 in.) FASTENER ALIGNMENT
2. Clean the body bonding surface with a sponge damp- 12.5 mm
12.5 mm (0.49 in.)
MARK
ened in alcohol. ALIGNMENT (0.49 in.)
MARK
NOTE: After cleaning, keep oil, grease and water
from getting on the surface.
WINDSHIELD SIDE
3. If the old windshield is to be reinstalled, use a putty SIDE
RUBBER RUBBER
knife to scrape off all traces of old adhesive, then DAM DAM
clean the windshield surface with alcohol where
new adhesive is to be applied.
NOTE: Make sure the bonding surface is kept free
of water, oil and grease. 686 mm 686 mm
(27 in.) (27 in.)
CAUTION: Avoid setting the windshield on its edges;
small chips may later develop into cracks.
NOTE:
Clean the shadowed area. DEFOGGER Contact.
SEAL LOWER
Clean area as shown.
RUBBER 12.5 mm
12.5 mm
DAM (0.49 in.)
(0.49 in.)
lnside
WINDSHIELD
ALIGNMENT ALIGNMENT
MARK MARK
DEFOGGER BLACK
SEAL CERAMIC
12.5 mm 26 mm EDGE
(0.49 in.) (1.02 in.)
LOWER WINDSHIELD
RUBBER
DAM
WINDSHIELD
Main Menu Table of Contents
Windshield
Installation (cont'd)
5. Glue the molding corner seal to the molding on 7. Install the fasteners to the body as shown.
each side.
Fastener locations, 2
MOLDING ALIGNMENT
MARK
MOLDING 2.5 mm
CORNER (0.98 in.)
SEAL
6. Align and glue the molding to the edge of the wind-
shield.
NOTE: Be careful not to touch the windshield
where adhesive will be applied. 8. Set the windshield, then center it in the opening. Make
alignment marks across the windshield and body with
ALIGNMENT a grease pencil at the four points shown.
Inside
MARK (White)
NOTE: Be careful not to touch the windshield where
ALIGNMENT
MARK MOLDING adhesive will be applied.
ADHESIVE
WINDSHIELD TAPE
ALIGNMENT MARK
MOLDING
WINDSHIELD
Alignment mark locations
ALIGNMENT Apply primer (3M N-200,
MARKS or equivalent) to edge WINDSHIELD
of the windshield.
9. Remove the windshield.
Main Menu Table of Contents
10. With a sponge, apply a light coat of glass primer 11. With a sponge, apply a light coat of body primer to
around the edge of the windshield as shown, then the original adhesive remaining around the wind-
lightly wipe it off with gauze or cheesecloth. shield opening flange. Let the body primer dry for
at least 10 minutes.
NOTE:
Do not apply body primer to the windshield, and NOTE:
do not get body and glass primer sponges mixed Do not apply glass primer to the body, and be care-
up. ful not to mix up glass and body primer sponges.
Never touch the primed surfaces with your hands. Never touch the primed surfaces with your hands.
If you do, the adhesive may not bond to the wind- Mask off the dashboard before painting the flange.
shield properly, causing a leak after the windshield
is installed. : Apply body primer here.
Keep water, dust, and abrasive materials away
from the primed surface. 20 mm (0.79 in.)
Apply glass primer here.
SIDE RUBBER MOLDING
Apply glass DAM Apply glass primer
primer to the to the molding.
molding.
Inside
MOLDING 9 mm
20 mm
(0.35 in.)
(0.79 in.)
Inside
WINDSHIELD
WINDSHIELD MOLDING 20 mm
(0.79 in.)
FASTENERS
SIDE
RUBBER SIDE
DAM RUBBER
DAM
12. Before filling a cartridge, cut the end of the nozzle
as shown.
Cut nozzle end
WINDSHIELD as shown.
LOWER RUBBER
DAM 10 mm (0.39 in.)
LOWER RUBBER
DAM
Inside
WINDSHIELD
7 mm (0.27 in.)
*: USA Model ◦ Jabse Service Manual Search 2026 ◦ Jabse Pravopis ◦ onTap.bg ◦ Other service manual resources online : Fixya ◦ eServiceinfo