Service Manuals, User Guides, Schematic Diagrams or docs for : . Car Manuals Acura 3.5RL 1996-2004 Approved srm RL9604S20027A
<< Back | HomeMost service manuals and schematics are PDF files, so You will need Adobre Acrobat Reader to view : Acrobat Download Some of the files are DjVu format. Readers and resources available here : DjVu Resources
For the compressed files, most common are zip and rar. Please, extract files with Your favorite compression software ( WinZip, WinRAR ... ) before viewing. If a document has multiple parts, You should download all, before extracting.
Good luck. Repair on Your own risk. Make sure You know what You are doing.
Image preview - the first page of the document
>> Download RL9604S20027A documenatation <<
Text preview - extract from the document
Main Menu Table of Contents
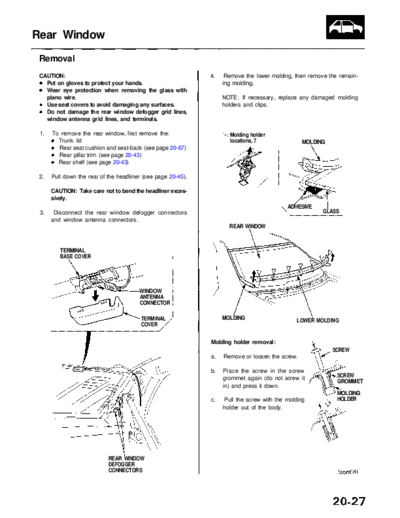
Rear Window
Removal
CAUTION: 4. Remove the lower molding, then remove the remain-
Put on gloves to protect your hands. ing molding.
Wear eye protection when removing the glass with
piano wire. NOTE: If necessary, replace any damaged molding
Use seat covers to avoid damaging any surfaces. holders and clips.
Do not damage the rear window defogger grid lines,
window antenna grid lines, and terminals.
1. To remove the rear window, first remove the: Molding holder
Trunk lid locations, 7 MOLDING
Rear seat cushion and seat-back (see page 20-67)
Rear pillar trim (see page 20-43)
Rear shelf (see page 20-43)
2. Pull down the rear of the headliner (see page 20-45).
CAUTION: Take care not to bend the headliner exces-
sively.
ADHESIVE
3. Disconnect the rear window defogger connectors GLASS
and window antenna connectors.
REAR WINDOW
TERMINAL
BASE COVER
WINDOW
ANTENNA
CONNECTOR
TERMINAL MOLDING LOWER MOLDING
COVER
Molding holder removal:
SCREW
a. Remove or loosen the screw.
b. Place the screw in the screw
SCREW
grommet again (do not screw it GROMMET
in) and press it down.
MOLDING
c. Pull the screw with the molding HOLDER
holder out of the body.
REAR WINDOW
DEFOGGER
CONNECTORS
Main Menu Table of Contents
Rear Window
Removal (cont'd)
5. Apply protective tape along the edge of the body as
shown. Using an awl, make a hole through the
adhesive from inside the vehicle. Push the piano
wire through the hole, and wrap each end around a
piece of wood.
6. With a helper on the outside, pull the piano wire
back and forth in a sawing motion, and carefully cut
through the adhesive around the entire rear win-
dow.
CAUTION: Hold the piano wire as close to the rear
window as possible to prevent damage to the body.
7. Carefully remove the rear window.
◦ Jabse Service Manual Search 2026 ◦ Jabse Pravopis ◦ onTap.bg ◦ Other service manual resources online : Fixya ◦ eServiceinfo