Service Manuals, User Guides, Schematic Diagrams or docs for : . Car Manuals Acura 3.5RL 1996-2004 Approved srm RL9604S20082A
<< Back | HomeMost service manuals and schematics are PDF files, so You will need Adobre Acrobat Reader to view : Acrobat Download Some of the files are DjVu format. Readers and resources available here : DjVu Resources
For the compressed files, most common are zip and rar. Please, extract files with Your favorite compression software ( WinZip, WinRAR ... ) before viewing. If a document has multiple parts, You should download all, before extracting.
Good luck. Repair on Your own risk. Make sure You know what You are doing.
Image preview - the first page of the document
>> Download RL9604S20082A documenatation <<
Text preview - extract from the document
Main Menu Table of Contents
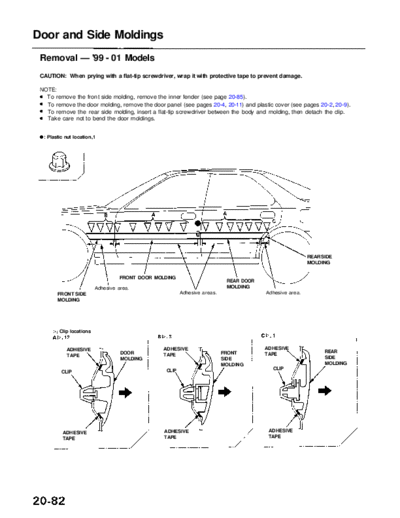
Door and Side Moldings
Removal -- '99 - 01 Models
CAUTION: When prying with a flat-tip screwdriver, wrap it with protective tape to prevent damage.
NOTE:
To remove the front side molding, remove the inner fender (see page 20-85).
To remove the door molding, remove the door panel (see pages 20-4, 20-11) and plastic cover (see pages 20-2, 20-9).
To remove the rear side molding, insert a flat-tip screwdriver between the body and molding, then detach the clip.
Take care not to bend the door moldings.
Plastic nut location,1
REAR SIDE
MOLDING
FRONT DOOR MOLDING
REAR DOOR
Adhesive area. MOLDING
FRONT SIDE Adhesive areas. Adhesive area.
MOLDING
Clip locations
ADHESIVE ADHESIVE ADHESIVE
DOOR FRONT REAR
TAPE TAPE TAPE
MOLDING SIDE SIDE
MOLDING MOLDING
CLIP CLIP
CLIP
ADHESIVE ADHESIVE ADHESIVE
TAPE TAPE TAPE
Main Menu Table of Contents
If the old molding is to be reinstalled: 7. Glue the new adhesive tape to the moldings as
shown.
The following materials and tools are required to repair
the molding.
: Adhesive tape locations
NOTE: Follow the manufacturer's instructions. Width: 5 mm (0.2 in.)
Thickness: 1.2 mm (0.05 in.)
Materials: (Reference) Forward
Stripe remover FRONT SIDE
3M 08907 MOLDING 65 mm
Stripe adhesive remover (2.6 in.)
3M 08908
Adhesive tape
3M Super Automotive Attachment Tape
Tools: FRONT DOOR
Protective tape Film MOLDING
Knife or cutter Putty knife
Sponge or shop towel Alcohol
Infrared dryer
CAUTION: Put on gloves to protect your hands.
820 mm (32.3 in.)
1. If necessary, replace any damaged clips on the mold-
ing.
REAR SIDE
2. Apply the stripe remover evenly to the bonding sur- MOLDING REAR DOOR
face of the body and molding. MOLDING
3. Cover the bonding surface of the body and molding 20 mm 65 mm
with a film, then heat to 104 - 122◦ Jabse Service Manual Search 2026 ◦ Jabse Pravopis ◦ onTap.bg ◦ Other service manual resources online : Fixya ◦ eServiceinfo