Service Manuals, User Guides, Schematic Diagrams or docs for : . Car Manuals Acura 3.5RL 1996-2004 Approved srm RL9604S22065A
<< Back | HomeMost service manuals and schematics are PDF files, so You will need Adobre Acrobat Reader to view : Acrobat Download Some of the files are DjVu format. Readers and resources available here : DjVu Resources
For the compressed files, most common are zip and rar. Please, extract files with Your favorite compression software ( WinZip, WinRAR ... ) before viewing. If a document has multiple parts, You should download all, before extracting.
Good luck. Repair on Your own risk. Make sure You know what You are doing.
Image preview - the first page of the document
>> Download RL9604S22065A documenatation <<
Text preview - extract from the document
Main Menu Table of Contents
Evaporator/Blower Unit
Replacement
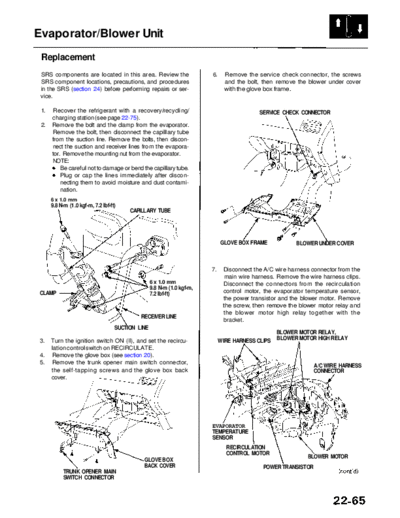
SRS components are located in this area. Review the 6. Remove the service check connector, the screws
SRS component locations, precautions, and procedures and the bolt, then remove the blower under cover
in the SRS (section 24) before performing repairs or ser- with the glove box frame.
vice.
1. Recover the refrigerant with a recovery/recycling/ SERVICE CHECK CONNECTOR
charging station (see page 22-75).
2. Remove the bolt and the clamp from the evaporator.
Remove the bolt, then disconnect the capillary tube
from the suction line. Remove the bolts, then discon-
nect the suction and receiver lines from the evapora-
tor. Remove the mounting nut from the evaporator.
NOTE:
Be careful not to damage or bend the capillary tube.
Plug or cap the lines immediately after discon-
necting them to avoid moisture and dust contami-
nation.
6 x 1.0 mm
9.8 N-m (1.0 kgf-m, 7.2 Ibf-ft)
CAPILLARY TUBE
GLOVE BOX FRAME BLOWER UNDER COVER
7. Disconnect the A/C wire harness connector from the
main wire harness. Remove the wire harness clips.
6 x 1.0 mm Disconnect the connectors from the recirculation
9.8 N-m (1.0 kgf-m,
CLAMP 7.2 Ibf-ft) control motor, the evaporator temperature sensor,
the power transistor and the blower motor. Remove
the screw, then remove the blower motor relay and
the blower motor high relay together with the
RECEIVER LINE
bracket.
SUCTION LINE
BLOWER MOTOR RELAY,
3. Turn the ignition switch ON (II), and set the recircu- WIRE HARNESS CLIPS BLOWER MOTOR HIGH RELAY
lation control switch on RECIRCULATE.
4. Remove the glove box (see section 20).
5. Remove the trunk opener main switch connector, A/C WIRE HARNESS
the self-tapping screws and the glove box back CONNECTOR
cover.
EVAPORATOR
TEMPERATURE
SENSOR
RECIRCULATION
CONTROL MOTOR
GLOVE BOX BLOWER MOTOR
BACK COVER POWER TRANSISTOR
TRUNK OPENER MAIN
SWITCH CONNECTOR
Main Menu Table of Contents
Evaporator/Blower Unit
Replacement (cont'd)
8. Remove the wire harness connectors and the SRS 11. Install in the reverse order of removal. Make note of
main harness clip from the body. Disconnect the the following items.
connectors from the multiplex control unit (passen-
ger's) unit. Loosen the upper mounting bolt, then If you're installing a new evaporator, add refrig-
remove the mounting bolts and the control unit. erant oil (ND-OIL 8) (see page 22-73).
Replace the O-rings with new ones at each fitting,
WIRE HARNESS
and apply a thin coat of refrigerant oil before
CONNECTORS
installing them.
NOTE: Be sure to use the right O-rings for HFC-
134a (R-134a) to avoid leakage.
Install the capillary tube along the suction line.
NOTE: Be careful not to damage or bend the
capillary tube.
Apply sealant to the grommets.
Make sure that there is no air leakage.
Charge the system (see page 22-89), and test its
performance (see page 22-76).
WIRE HARNESS
CONNECTORS MULTIPLEX
CONTROL
SRS MAIN HARNESS CLIP
UNIT
(PASSENGER'S)
9. Remove the dust and pollen filter assemblies (see
page 22-68).
10. Disconnect the drain hose. Remove the self-tapping
screws, the mounting bolts, the mounting nuts and
the evaporator/blower unit.
NOTE: Be careful not to damage or bend the capil-
lary tube.
6 x 1.0 mm
9.8 N-m
(1.0 kgf-m, 7.2 Ibf-ft)
DRAIN HOSE
EVAPORATOR-BLOWER UNIT
6 x 1.0 mm
9.8 N-m (1.0 kgf-m, 7.2 Ibf-ft)
◦ Jabse Service Manual Search 2026 ◦ Jabse Pravopis ◦ onTap.bg ◦ Other service manual resources online : Fixya ◦ eServiceinfo