Service Manuals, User Guides, Schematic Diagrams or docs for : . Car Manuals Acura 3.5RL 1996-2004 Approved srm RL9604S22086A
<< Back | HomeMost service manuals and schematics are PDF files, so You will need Adobre Acrobat Reader to view : Acrobat Download Some of the files are DjVu format. Readers and resources available here : DjVu Resources
For the compressed files, most common are zip and rar. Please, extract files with Your favorite compression software ( WinZip, WinRAR ... ) before viewing. If a document has multiple parts, You should download all, before extracting.
Good luck. Repair on Your own risk. Make sure You know what You are doing.
Image preview - the first page of the document
>> Download RL9604S22086A documenatation <<
Text preview - extract from the document
                 Main Menu                     Table of Contents


Condenser
 Replacement
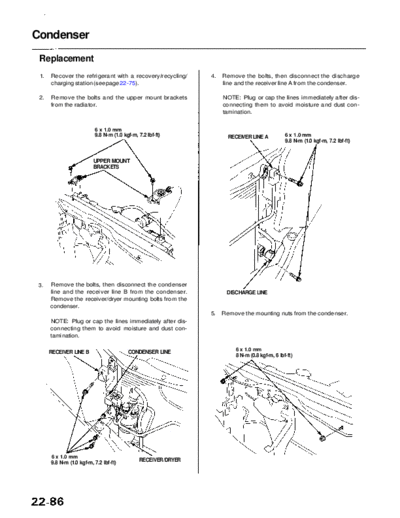
 1.   Recover the refrigerant with a recovery/recycling/           4.   Remove the bolts, then disconnect the discharge
      charging station (see page 22-75).                                line and the receiver line A from the condenser.

 2.   Remove the bolts and the upper mount brackets                     NOTE: Plug or cap the lines immediately after dis-
      from the radiator.                                                connecting them to avoid moisture and dust con-
                                                                        tamination.


                          6 x 1.0 mm
                          9.8 N-m (1.0 kgf-m, 7.2 Ibf-ft)                 RECEIVER LINE A          6 x 1.0 mm
                                                                                                   9.8 N-m (1.0 kgf-m, 7.2 Ibf-ft)


                          UPPER MOUNT
                          BRACKETS


 3.   Remove the bolts, then disconnect the condenser
      line and the receiver line B from the condenser.                   DISCHARGE LINE
      Remove the receiver/dryer mounting bolts from the
      condenser.
                                                                   5.   Remove the mounting nuts from the condenser.
      NOTE: Plug or cap the lines immediately after dis-
      connecting them to avoid moisture and dust con-
      tamination.


                                         CONDENSER LINE                     6 x 1.0 mm
      RECEIVER LINE B
                                                                            8 N-m (0.8 kgf-m, 6 Ibf-ft)


      6 x 1.0 mm
                                               RECEIVER/DRYER
      9.8 N-m (1.0 kgf-m, 7.2 Ibf-ft)
             Main Menu                Table of Contents


6.   Remove the bolts and the upper mount brackets        8.   Install in the reverse order of removal. Make note of
     from the condenser as shown.                              the following items.

                                                                  If you're installing a new condenser, add refriger-
                               UPPER MOUNT BRACKETS               ant oil (ND-OIL 8) (see page 22-73).
                                                                  Replace the O-rings with new ones at each fit-
                                                                  ting, and apply a thin coat of refrigerant oil
                                                                  before installing them.
                                                                  NOTE: Be sure to use the right O-rings for HFC -
                                                                  134a (R - 134a) to avoid leakage.
                                                                  Be careful not to damage the radiator and the
                                                                  condenser fins when installing the condenser.
                                                                  Be sure to install the lower mount cushions of
                                                                  condenser securely into the holes.
                                                                  Charge the system (see page 22-89), and test its
                                                                  performance (see page 22-76).


7.   Remove the condenser by lifting it up as shown.

     NOTE: Be careful not to damage the radiator and
     the condenser fins when removing the condenser.


                                     CONDENSER
◦ Jabse Service Manual Search 2026 ◦ Jabse Pravopis ◦ onTap.bg ◦ Other service manual resources online : Fixya ◦ eServiceinfo