Service Manuals, User Guides, Schematic Diagrams or docs for : . Car Manuals Acura 3.5RL 1996-2004 Approved srm RL9604S23360A
<< Back | HomeMost service manuals and schematics are PDF files, so You will need Adobre Acrobat Reader to view : Acrobat Download Some of the files are DjVu format. Readers and resources available here : DjVu Resources
For the compressed files, most common are zip and rar. Please, extract files with Your favorite compression software ( WinZip, WinRAR ... ) before viewing. If a document has multiple parts, You should download all, before extracting.
Good luck. Repair on Your own risk. Make sure You know what You are doing.
Image preview - the first page of the document
>> Download RL9604S23360A documenatation <<
Text preview - extract from the document
Main Menu Table of Contents
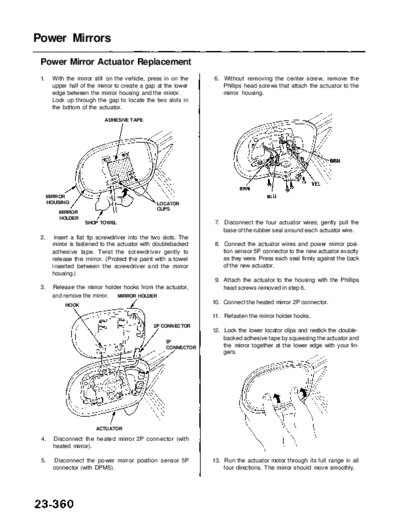
Power Mirrors
Power Mirror Actuator Replacement
1. With the mirror still on the vehicle, press in on the 6. Without removing the center screw, remove the
upper half of the mirror to create a gap at the lower Phillips head screws that attach the actuator to the
edge between the mirror housing and the mirror. mirror housing.
Look up through the gap to locate the two slots in
the bottom of the actuator.
ADHESIVE TAPE
MIRROR
HOUSING LOCATOR
CLIPS
MIRROR
HOLDER
SHOP TOWEL 7. Disconnect the four actuator wires; gently pull the
base of the rubber seal around each actuator wire.
2. Insert a flat tip screwdriver into the two slots. The
mirror is fastened to the actuator with doublebacked 8. Connect the actuator wires and power mirror posi-
adhesive tape. Twist the screwdriver gently to tion sensor 5P connector to the new actuator exactly
release the mirror. (Protect the paint with a towel as they were. Press each seal firmly against the back
inserted between the screwdriver and the mirror of the new actuator.
housing.)
9. Attach the actuator to the housing with the Phillips
3. Release the mirror holder hooks from the actuator, head screws removed in step 6.
and remove the mirror. MIRROR HOLDER
HOOK
10. Connect the heated mirror 2P connector.
11. Refasten the mirror holder hooks.
2P CONNECTOR
12. Lock the lower locator clips and restick the double-
backed adhesive tape by squeezing the actuator and
5P
CONNECTOR the mirror together at the lower edge with your fin-
gers.
ACTUATOR
4. Disconnect the heated mirror 2P connector (with
heated mirror).
5. Disconnect the power mirror position sensor 5P 13. Run the actuator motor through its full range in all
connector (with DPMS). four directions. The mirror should move smoothly.
◦ Jabse Service Manual Search 2026 ◦ Jabse Pravopis ◦ onTap.bg ◦ Other service manual resources online : Fixya ◦ eServiceinfo