Service Manuals, User Guides, Schematic Diagrams or docs for : . Car Manuals Jeep Cherokee XJ 1988-1989.1993-1995 Approved 1994 XJ Jeep Cherokee 94XJ_8H
<< Back | HomeMost service manuals and schematics are PDF files, so You will need Adobre Acrobat Reader to view : Acrobat Download Some of the files are DjVu format. Readers and resources available here : DjVu Resources
For the compressed files, most common are zip and rar. Please, extract files with Your favorite compression software ( WinZip, WinRAR ... ) before viewing. If a document has multiple parts, You should download all, before extracting.
Good luck. Repair on Your own risk. Make sure You know what You are doing.
Image preview - the first page of the document
>> Download 94XJ_8H documenatation <<
Text preview - extract from the document
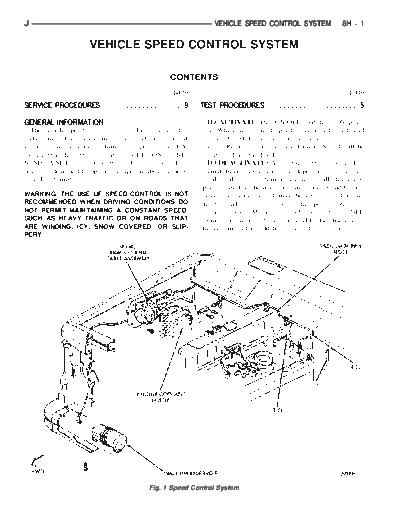
J VEHICLE SPEED CONTROL SYSTEM 8H - 1
VEHICLE SPEED CONTROL SYSTEM
CONTENTS
page page
SERVICE PROCEDURES . . . . . . . . . . . . . . . . . . . 9 TEST PROCEDURES . . . . . . . . . . . . . . . . . . . . . . 5
GENERAL INFORMATION TO ACTIVATE: Put ON/OFF switch in ON posi-
The vehicle speed control system (Fig. 1) is electri- tion. When the desired speed is achieved, push and
cally actuated and vacuum operated. The turn signal release the SET button to turn on and engage the
lever on the steering column incorporates a slide system. Remove foot from accelerator. Speed will be
switch that has three positions OFF, ON or RE- maintained at this level.
SUME. A SET button is in the end of the lever. This TO DEACTIVATE: A soft tap of the brake pedal,
device is designed to operate at speeds above approx- normal brake application or depressing the clutch
imately 35 mph. pedal while the system is engaged will disengage
speed control without erasing memory. A sudden in-
WARNING: THE USE OF SPEED CONTROL IS NOT crease in engine speed may be experienced if the
RECOMMENDED WHEN DRIVING CONDITIONS DO clutch pedal is depressed while the speed control sys-
NOT PERMIT MAINTAINING A CONSTANT SPEED, tem is engaged. Moving the slide switch to the OFF
SUCH AS HEAVY TRAFFIC OR ON ROADS THAT position or turning the ignition OFF also disengages
ARE WINDING, ICY, SNOW COVERED, OR SLIP- the system and in addition erases the memory.
PERY.
Fig. 1 Speed Control System
8H - 2 VEHICLE SPEED CONTROL SYSTEM J
TO RESUME AFTER BRAKING: After disen- lease accelerator and vehicle will return to previous
gaging the speed control system by tapping the brake speed setting. There may be a slight (3-7 mph) speed
pedal or clutch pedal, push the RESUME/ACCEL loss before the vehicle recovers to the set speed.
button to return vehicle to the previously set speed. TAP-UP: When the speed control system is en-
SET/COAST: Speed can be decreased by holding gaged, tapping the RESUME/ACCEL button will in-
SET button against stop until desired speed is at-
crease the speed setting by 2 mph (3 km/h). The
tained. Releasing the button engages the system at
system will respond to multiple tap-ups.
that speed. A decrease in speed also can be attained
TO ACCELERATE: While speed control is en-
by tapping brake pedal lightly disengaging system.
When desired speed has been obtained push and re- gaged, hold the RESUME/ACCEL button depressed
lease SET button. and release at a new desired speed. This will allow
TO ACCELERATE FOR PASSING: Depress ac- the vehicle to accelerate and set at a higher speed
celerator as needed. When passing is completed, re- setting.
J VEHICLE SPEED CONTROL SYSTEM 8H - 3
8H - 4 VEHICLE SPEED CONTROL SYSTEM J
J VEHICLE SPEED CONTROL SYSTEM 8H - 5
TEST PROCEDURES
INDEX
page page
Checking for Diagnostic Trouble Code .... .. . . . 5 Speed Control Switch (Turn Signal Lever) Test .. . 7
Electrical Tests at Powertrain Control Module . . . . 6 Stop Lamp Speed Control Switch Test . . . . . ... . 7
Electrical Tests at Servo . . . . . . . . . . . . . . . .. . . . 5 Vacuum Supply Test . . . . . . . . . . . . . . . . . . . ... . 7
Inoperative System . . . . . . . . . . . . . . . . . . . .. . . . 5 Vehicle Speed Control System Electrical Tests .. . 5
Operational Check (Road Test) . . . . . . . . . . .. . . . 7 Vehicle Speed Sensor Test . . . . . . . . . . . . . . ... . 5
Road Test . . . . . . . . . . . . . . . . . . . . . . . . . . .. . . . 5
ROAD TEST VEHICLE SPEED SENSOR TEST
Refer to Operational Check (Road Test) section to For testing of the vehicle speed sensor and related
verify reports of speed control system malfunction. components, refer to Powertrain Diagnostic Proce-
dures manual.
INOPERATIVE SYSTEM
Road test vehicle to verify reports of speed control
VEHICLE SPEED CONTROL SYSTEM ELECTRICAL
system malfunction. An inspection should be made
for loose electrical and vacuum connections at the
TESTS
Vehicle speed control systems may be tested using
servo.
two different methods. One involves use of a DRB
Check for correct installation of the vacuum check
valve in the hose from servo to vacuum source. The scan tool. If this test method is desired, refer to Pow-
word VAC on the valve must point toward the vac- ertrain Diagnostic Procedures manual.
uum source. The other test method uses a voltmeter. The volt-
Corrosion should be removed from electrical termi- meter method is described in the following tests.
nals and a light coating of Mopar MultiPurpose If any information is needed concerning wiring, re-
Grease, or equivalent, applied. fer to Section 8W - Wiring Diagrams.
Inspection also should be made to verify that both
ends of the speed control cable are securely attached. CAUTION: When test probing for voltage or conti-
nuity at electrical connectors, care must be taken
CHECKING FOR DIAGNOSTIC TROUBLE CODE not to damage connector, terminals, or seals. If
(1) When trying to verify a speed control system
these components are damaged, intermittent or
electronic malfunction use a DRB scan tool to find
complete system failure may occur.
the cause (refer to Powertrain Diagnostic Procedures
manual).
If DRB is not available, the Diagnostic Trouble ELECTRICAL TESTS AT SERVO
Code (DTC) may be determined with the following (1) Turn ignition switch to the ON position. With
method: speed control switch in the ON position, setup a volt-
(a) With key inserted in ignition switch, cycle meter to read battery voltage and connect negative
switch to ON position 3 times. On third cycle, leave lead to a good chassis ground.
switch in ON position. (2) Disconnect 4-way connector going to servo
(b) After switch has been cycled 3 times, observe
(Figs. 2 and 3). Blue wire with red tracer of main
Malfunction Indicator Lamp (CHECK ENGINE)
harness 4-way connector should read approximately
on instrument cluster. If a DTC is present, the code
battery voltage. If not, check for loose connections,
will be displayed in a series of flashes representing
brake switch adjustment or, repair main harness as
digits. Three flashes in rapid succession, a slight
pause, then 4 flashes in rapid succession would in- necessary.
dicate DTC 34. (3) Connect a jumper wire between male and fe-
(2) If a DTC 34 is observed, perform tests in the male terminals of blue wire with red tracer. The
sections Electrical Tests at Servo and Electrical Tests other 3 male terminals from servo should show bat-
at Powertrain Control Module. tery voltage. If not, replace servo.
If a DTC 15 is observed, perform test for a faulty (4) Using an ohmmeter, connect one lead to a good
vehicle speed sensor. body ground. Touch other lead to black wire terminal
(3) Correct any problems found when performing in 4-way connector of main harness. Meter should
these tests and recheck for DTC if changes were show continuity. If not, repair ground circuit as nec-
made. essary.
8H - 6 VEHICLE SPEED CONTROL SYSTEM J
Fig. 4 Powertrain Control Module and Connector
Location
Fig. 2 Servo And Harness Connector--Left Hand
Drive
Fig. 5 Powertrain Control Module 60-Way Connector
Shown from Terminal End
(4) Touch positive lead of the voltmeter to terminal
in cavity number 53. As in step (3), voltmeter should
read 0 volts with switch in OFF position and battery
voltage with switch in ON position.
(5) Touch positive lead of voltmeter to terminal in
cavity number 48. With speed control switch in OFF
position, voltmeter should read 0 volts. With switch
in ON position, voltmeter should read battery volt-
age. Pressing SET button should cause voltmeter to
change from battery voltage to 0 volts for as long as
Fig. 3 Servo And Harness Connector--Right Hand the switch is held. If not, perform the speed control
Drive switch test. If the switch is not at fault, then check
ELECTRICAL TESTS AT POWERTRAIN CONTROL main harness and repair as necessary.
MODULE (6) Touch positive lead of voltmeter to terminal in
(1) Unplug 60-way connector from Powertrain Con- cavity number 50. The voltmeter should read 0 volts
trol Module, located on drivers side fender (Fig. 4). with speed control switch in either OFF or ON posi-
(2) Connect negative lead of voltmeter to a good tion. With switch in either RESUME or SET posi-
body ground near module. tion, voltmeter should read battery voltage. If not,
(3) For the following tests, ignition switch must be perform the speed control switch test. If the switch is
in ON position. Refer to Fig. 5 for controller terminal not at fault, then check main harness and repair as
locations. Touch positive lead of voltmeter to termi- necessary.
nal in cavity number 33. With speed control switch (7) Touch positive lead of voltmeter to terminal in
in OFF position, voltmeter should read 0 volts. With cavity number 49. The voltmeter should read 0 volts
speed control switch in ON position, voltmeter should with switch in OFF position. With switch in ON po-
read battery voltage. If not, repair main harness as sition, voltmeter should read battery voltage. The
voltmeter will continue to read battery voltage when
necessary.
either the SET or RESUME switch is pressed. If not,
J VEHICLE SPEED CONTROL SYSTEM 8H - 7
perform the speed control switch test. If switch is not pedal is in normal position. The test light should go
at fault, then check main harness and repair as nec- off when brake pedal is depressed approximately 3/8
essary. of an inch.
(8) Using an ohmmeter, connect one lead to a good (2) If test lamp does not respond properly, the stop
body ground and touch other lead to terminal in cav- lamp switch is defective or out of adjustment.
ity number 29. With brake pedal released, meter (3) Stop lamp switch adjustment is detailed in
should show continuity. When pedal is depressed, Group 5 - Brakes section of this manual.
meter should show open circuit.
VACUUM SUPPLY TEST
SPEED CONTROL SWITCH (TURN SIGNAL LEVER) (1) Disconnect vacuum hose at servo or vacuum
TEST reservoir and install a vacuum gauge in hose (Fig.
6).
(2) Start engine and observe gauge at idle. Vac-
uum gauge should read at least ten inches of mer-
cury.
(3) If vacuum does not meet this requirement,
check for vacuum leaks or poor engine performance.
OPERATIONAL CHECK (ROAD TEST)
The following sequential checks are performed with
the speed switch ON and vehicle speed faster than 35
mph:
STOP LAMP SPEED CONTROL SWITCH TEST (1) Press the SET button in end of multi-function
(1) Disconnect double connector at switch pigtail lever. Vehicle should maintain set speed.
and connect a 12 volt source to either terminal. Con- (2) Hold SET button in, and remove foot from ac-
nect a test lamp between other terminal and a good celerator. Vehicle should coast to a slower speed.
ground. The test lamp should be on when brake (3) Release SET button. Speed control will engage
and hold a slower speed, provided the speed remains
above 35 mph.
8H - 8 VEHICLE SPEED CONTROL SYSTEM J
(4) Slide speed switch to RESUME/ACCEL and
hold it there. Vehicle should accelerate.
(5) Release speed switch back to ON. Vehicle will
hold the new faster speed, if SET speed button has
been pressed.
(6) Tap brake pedal. Vehicle will decelerate.
If vehicle has a manual transmission, repeat test,
but depress the clutch pedal.
(7) Slide speed switch momentarily RESUME/AC-
CEL. Vehicle will accelerate to former set speed.
(8) While cruising, accelerate, then remove foot
from accelerator. Vehicle will coast back to set speed.
(9) While speed control is engaged, tap SET but-
ton. Vehicle speed will increase 2 mph for each time
SET button is tapped.
Fig. 6 Vacuum Gauge Test
J VEHICLE SPEED CONTROL SYSTEM 8H - 9
SERVICE PROCEDURES
INDEX
page page
Servo Cable Replacement . . . . . . . . . . . . . . . . . . . 9 Speed Control Switch Replacement ............ 9
Speed Control Servo Replacement . . . . . . . . . . . . 9
SPEED CONTROL SERVO REPLACEMENT
REMOVAL
(1) Disconnect vacuum hose at servo (Figs. 1 and
2).
(2) Disconnect electrical connector at servo.
(3) Remove 2 nuts from cable sleeve.
(4) Pull speed control cable away from servo to ex-
pose cable retaining clip.
(5) Remove clip attaching cable to servo.
(6) Pull servo away from mounting bracket.
Fig. 2 Speed Control Servo--Right Hand Drive
SERVO CABLE REPLACEMENT
CAUTION: Use finger pressure only to remove the
speed control cable connector at the bell crank. Pli-
ers or screwdriver can break connector requiring
complete cable replacement.
(1) Using finger pressure only, remove speed con-
trol cable connector at bell crank by pushing connec-
tor off the bell crank (Fig. 3). DO NOT try to pull
connector off perpendicular to the bell crank.
(2) Squeeze tabs on speed control cable and push
out of locking plate (Fig. 4).
(3) Pull cable out of cable guide.
(4) Remove 2 nuts and cable housing from servo.
(5) Release cable clip from servo cable and remove
servo cable.
Fig. 1 Speed Control Servo--Left Hand Drive
(6) To install, reverse the removal procedure.
INSTALLATION
(1) Insert servo studs through holes in servo SPEED CONTROL SWITCH REPLACEMENT
mounting bracket. (1) Disconnect negative cable from battery.
(2) With throttle blocked to full open position, (2) Remove horn button with a push and turn mo-
align hole in cable sleeve with hole in servo pin and tion.
install retaining clip. (3) Remove horn button components (Fig. 5).
(3) Insert servo studs through holes in cable sleeve. (4) Turn ignition switch to LOCK position and re-
(4) Install 2 attaching nuts and tighten to 6 N m move steering wheel nut and washer.
(50 in. lbs.). (5) Scribe an alignment mark on the steering in
(5) Connect vacuum hose to servo. line with the mark already existing on the end of the
(6) Connect electrical connector to servo terminals. steering column.
8H - 10 VEHICLE SPEED CONTROL SYSTEM J
Fig. 5 Steering Wheel Removal/Installation
(7) Remove steering wheel using a steering wheel
puller.
WARNING: TO REMOVE THE STEERING SHAFT
SNAP RING IN THE FOLLOWING STEP, THE LOCK-
Fig. 3 Remove Bell Crank Connector PLATE MUST BE COMPRESSED. DO NOT ATTEMPT
TO REMOVE THE LOCKPLATE WITHOUT COM-
PRESSOR TOOL C4156 AS THE LOCKPLATE IS UN-
DER HEAVY SPRING TENSION.
(8) Compress lockplate with compressor tool
C4156.
(9) Remove steering shaft snap ring (Fig. 6). Dis-
card snap ring. It is not reusable.
(10) Remove compressor tool.
(11) Remove lockplate, cancelling cam, and upper
bearing preload spring.
(12) Remove horn button components from cancel-
ing cam.
(13) Remove screw and hazard warning switch
knob.
(14) Remove actuator arm attaching screw.
(15) Remove turn signal switch attaching screws.
(16) Unplug speed control switch connector.
(17) Pull speed control harness out of the column.
(18) Insert ignition key in lock cylinder and turn
key to ON position.
(19) Remove key warning buzzer switch and re-
Fig. 4 Remove/Install Speed Control Cable to
taining clip with a paper clip inserted below retainer
Locking Plate
so that retainer is flattened (Fig. 7).
(6) Remove vibration damper from the steering col- Do not attempt to remove buzzer switch and
umn hub, if equipped. clip separately. The clip could fall into the col-
umn jacket.
J VEHICLE SPEED CONTROL SYSTEM 8H - 11
Fig. 6 Lockplate Removal Fig. 8 Lock Cylinder Removal/Installation
Fig. 7 Buzzer Switch Removal Fig. 9 Steering Column Housing
Removal/Installation
(20) Remove ignition lock cylinder retaining screw
and pull lock cylinder out of column housing (Fig. 8). (23) Remove wiper switch cover from back of hous-
(21) Remove screws that attach housing and ing and shroud assembly (Fig. 10). If equipped with
shroud assembly to column jacket and carefully re- column shift, remove screw holding the cover on.
move housing and shroud assembly (Fig. 9). (24) Remove pivot screw from housing and remove
Do not let dimmer switch rod, lock pin or lock wiper switch.
rack fall out. (25) Install a new switch and switch cover.
(22) Remove turn signal/wiper lever by pulling it (26) Push on dimmer switch rod to make sure it is
straight out of column. connected then carefully position housing and shroud
assembly to column (Fig. 11).
8H - 12 VEHICLE SPEED CONTROL SYSTEM J
Fig. 10 Remove Pivot Screw
Make sure nylon spring retainer on the lock Fig. 11 Check Dimmer Switch Rod and Lock Pin
pin is positioned forward of retaining slot of
(29) To install remaining parts, reverse the re-
lock rack (Fig. 11).
moval procedures.
Position the first tooth of gear (farthest from
the block tooth) with the most forward tooth of CAUTION: When installing a wiper switch, make
lock rack. sure wires are laying flat on bottom inside column.
(27) Install screws that attach housing and shroud On vehicles equipped with column shift, in-
assembly to column jacket and carefully mate hous- stall PRNDL cable clip with shift indicator on
ing and shroud assembly. N. Move selector through the range and make
(28) Insert key and lock cylinder and test that the sure it lines up with each letter.
lock pin extends fully when key is moved to lock po- (30) Install steering wheel. Tighten steering wheel
nut to 34 N m (25 ft. lbs.) torque.
sition.
◦ Jabse Service Manual Search 2026 ◦ Jabse Pravopis ◦ onTap.bg ◦ Other service manual resources online : Fixya ◦ eServiceinfo