Service Manuals, User Guides, Schematic Diagrams or docs for : . Car Manuals Nissan Micra 2003-2006 Approved sma CO-K9K-001
<< Back | HomeMost service manuals and schematics are PDF files, so You will need Adobre Acrobat Reader to view : Acrobat Download Some of the files are DjVu format. Readers and resources available here : DjVu Resources
For the compressed files, most common are zip and rar. Please, extract files with Your favorite compression software ( WinZip, WinRAR ... ) before viewing. If a document has multiple parts, You should download all, before extracting.
Good luck. Repair on Your own risk. Make sure You know what You are doing.
Image preview - the first page of the document
>> Download CO-K9K-001 documenatation <<
Text preview - extract from the document
ENGINE COOLANT
ENGINE COOLANT
Changing Engine Coolant To ESM
WARNING:
q To avoid being scalded, never change the coolant when the engine is hot.
q Wrap a thick cloth around cap and carefully remove the cap. First, turn the cap a quarter of a turn
to release built-up pressure. Then turn the cap all the way.
DRAINING ENGINE COOLANT
1. Remove engine undercover.
2. Disconnect lower radiator hose, and remove reservoir tank cap
and air relief plug.
3. Remove reservoir tank, drain coolant, then clean reservoir tank.
4. Check drained coolant for contaminants such as rust, corrosion
or discoloration.
If contaminated, flush engine cooling system. Refer to CO-2,
FLUSHING COOLING SYSTEM in this SMA file.
5. Remove air relief plug from water outlet.
Refer to CO-42, WATER OUTLET on ESM.
MBIB1056E
REFILLING ENGINE COOLANT
q Before start working, turn off the automatic air conditioner and the blower motor.
1. Install reservoir tank, lower radiator hose and air relief plug.
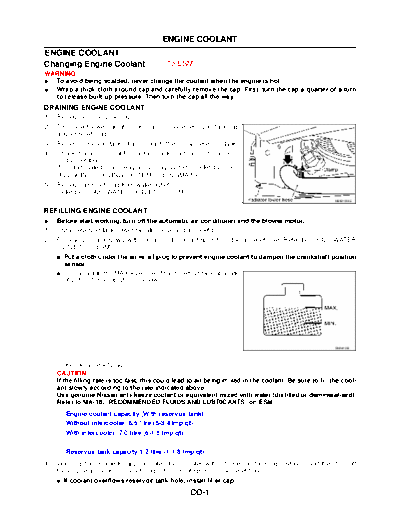
2. Fill reservoir tank slowly with coolant until coolant spills from the air relief hole. Refer to CO-42, WATER
OUTLET on ESM.
q Put a cloth under the air relief plug to prevent engine coolant to dampen the crankshaft position
sensor.
q Fill coolant to the MAX level line of the reservoir tank at a rate
of 2 litre (1-3/4 lmp qt)/min or lower.
SMA412B
3. Close the air relief plug.
CAUTION:
If the filling rate is too fast, this could lead to air being mixed in the coolant. Be sure to fill the cool-
ant slowly according to the rate indicated above.
Use genuine Nissan anti-freeze coolant or equivalent mixed with water (distilled or demineralised).
Refer to MA-18, RECOMMENDED FLUIDS AND LUBRICANTS on ESM.
Engine coolant capacity (With reservoir tank)
Without intercooler: 6.5 litre (5-3/4 lmp qt)
With intercooler: 7.0 litre (6-1/8 lmp qt)
Reservoir tank capacity 1.2 litre (1-1/8 lmp qt)
4. Warm up the engine for approximately five minutes without reservoir tank cap installed, and then turn off
the engine and loose air relief plug until coolant spills from air relief hole.
q If coolant overflows reservoir tank hole, install filler cap.
CO-1
ENGINE COOLANT
q Watch engine coolant temperature warning light so as not overheat the engine during all of the
operation.
WARNING:
q Be careful not be scaled with hot engine coolant or vacuum pump when operating.
q Radiator fan blade can start at any time and make personal injuries.
5. Close the air relief plug and run the engine at 2,000 rpm until the upper hose comes hot and radiator fan
operates. Let the engine running approximately 5 minutes at idle speed and check for sound of coolant
flow while running engine from idle up to 3,000 rpm.
q Sound may be noticeable at heater water cock.
6. If sound is heard, bleed air from cooling system by repeating steps 4 through 5 until coolant lever no
longer drops.
q Check the radiator lower hose for any signs of leakage.
7. Turn off the engine and let it cool down.
q Cool down using a fan to reduce the time.
8. After cooling period, loose the air relief plug and check if coolant spills from the air relief hole. In other
case, remove the air relief plug until the coolant spills, and then close the relief air plug. Bleed air from
cooling system by repeating steps 5 through 8 until the coolant spills immediately.
9. Check the engine coolant level when engine is cool and refill to MAX level line if the level is lower.
q Clean excess coolant from engine.
FLUSHING COOLING SYSTEM
1. Fill reservoir tank with water until water spills from the air relief hole, then close air relief plug. Reinstall
reservoir tank cap.
2. Run engine and warm it up to normal operating temperature.
3. Rev engine two or three times under no-load.
4. Stop engine and wait until it cools down.
5. Drain water.
6. Repeat steps 1 through 5 until clear water begins to drain from radiator.
7. Blow compressed air into cooling circuit through the reservoir tank valve hole to drain all the water.
CO-2
RADIATOR
RADIATOR
Removal and Installation To ESM
MBIB1261E
1. Radiator 2. Mounting rubber 3. Radiator hose (upper)
4. Hose clamp 5. Hose clamp 6. Reservoir tank hose
7. Reservoir tank 8. Cooling fan assembly 9. Hose clamp
10. Radiator hose (lower) 11. Hose clamp 12. Reservoir tank hose
13. Mounting rubber
CO-3
RADIATOR
MBIB1262E
1. Radiator 2. Mounting rubber 3. Radiator hose (upper)
4. Hose clamp 5. Hose clamp 6. Reservoir tank hose
7. Reservoir tank 8. Cooling fan assembly 9. Hose clamp
10. Radiator hose (lower) 11. Hose clamp 12. Reservoir tank hose
13. Mounting rubber
WARNING:
Never remove the reservoir tank cap when the engine is hot. Serious burns could occur from high
pressure coolant escaping from the radiator. Wrap a thick cloth around the cap. Slowly turn it a quar-
ter turn to allow built-up pressure to escape. Carefully remove the cap by turning it all the way.
REMOVAL
1. Remove engine room cover. Refer to EM-119, ENGINE ROOM COVER on ESM.
2. Remove air cleaner case and air duct (inlet). Refer to EM-123, AIR CLEANER AND AIR DUCT on ESM.
3. Remove reservoir tank hose bracket bolt from radiator upper mounting bracket (RH side).
4. Remove radiator fan motor harnesses.
5. Remove engine undercover.
6. Drain engine coolant. Refer to CO-1, DRAINING ENGINE COOLANT in this SMA file.
CAUTION:
Perform when engine is cold.
7. Disconnect radiator upper hose, reservoir tank hose and mounting bracket.
8. Remove radiator and radiator fan assembly.
q For model with A/C, remove radiator and condenser assembly. Refer to ATC-84, REFRIGRANT LINES
on ESM.
q For model with charge air cooler. Refer to EM-125, CHARGE AIR COOLER on ESM.
CAUTION:
q Do not damage or scratch radiator core when removing.
CO-4
RADIATOR
INSTALLATION
q Reinstall any parts removed in reverse order of removal.
q Check for engine coolant leaks. Refer to CO-31, LEAK CHECK on ESM.
Disassembly and Assembly Radiator Fan To ESM
MBIB1263E
1. Radiator fan motors 2. Radiator fan shroud 3. Radiator fan
4. Retaining nut
CO-5
RADIATOR
MBIB1264E
1. Radiator fan motors 2. Radiator fan shroud 3. Radiator fan
4. Clip
DISASSEMBLY
1. Remove radiator fan and shroud assembly.
2. Remove radiator fan as shown.
MBIB1062E
MBIB1063E
3. Remove fan motor from fan shroud.
CO-6
RADIATOR
ASSEMBLY
Install in the reverse order of removal.
CO-7
◦ Jabse Service Manual Search 2026 ◦ Jabse Pravopis ◦ onTap.bg ◦ Other service manual resources online : Fixya ◦ eServiceinfo