Service Manuals, User Guides, Schematic Diagrams or docs for : . Car Manuals Nissan Micra 2003-2006 Approved sma ATC-003
<< Back | HomeMost service manuals and schematics are PDF files, so You will need Adobre Acrobat Reader to view : Acrobat Download Some of the files are DjVu format. Readers and resources available here : DjVu Resources
For the compressed files, most common are zip and rar. Please, extract files with Your favorite compression software ( WinZip, WinRAR ... ) before viewing. If a document has multiple parts, You should download all, before extracting.
Good luck. Repair on Your own risk. Make sure You know what You are doing.
Image preview - the first page of the document
>> Download ATC-003 documenatation <<
Text preview - extract from the document
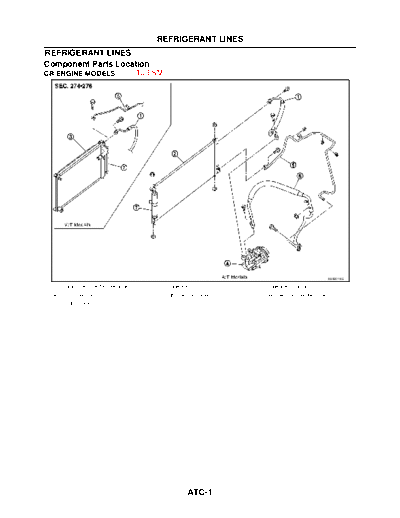
                                         REFRIGERANT LINES
REFRIGERANT LINES
Component Parts Location
CR ENGINE MODELS                     To ESM


                                                                                                     MJIB0114E

  1.   High-pressure flexible hose      2.    Condenser            3.   Condenser (Radiator)
  4.   Compressor                       5.    High-pressure pipe   6.   Low-pressure flexible hose
  7.   Liquid tank


                                                       ATC-1
                                             REFRIGERANT LINES
K9K ENGINE MODELS                    To ESM


                                                                                                      MJIB0115E

 1.   High-pressure flexible hose       2.    Refrigerant pressure sensor   3.   Liquid tank
 4.   Radiator (Condenser)              5.    Condensor                     6.   Compressor
 7.   Service valve (Low pressure)      8.    Low-pressure flexible hose    9.   High-pressure pipe
 10. Service valve (High pressure)


                                                        ATC-2
                                          REFRIGERANT LINES
Removal and Installation for Pipe and Hose (K9K Engine Models)
COMPONENTS                   To ESM


                                                                                                      MJIB0115E

     1.   High-pressure flexible hose    2.   Refrigerant pressure sensor   3.   Liquid tank
     4.   Radiator (Condenser)           5.   Condensor                     6.   Compressor
     7.   Service valve (Low pressure)   8.   Low-pressure flexible hose    9.   High-pressure pipe
     10. Service valve (High pressure)

REMOVAL                To ESM
1.    Use recovery/recycling recharging equipment [for HFC-134a (R-134a)] to discharge refrigerant.
2.    Remove the low-pressure flexible hose bracket mounting bolt and nut.
3.    Remove the high-pressure pipe and low-pressure flexible hose mounting bolts (air conditioner unit side).
      CAUTION:
      Seal the connecting points of the pipe and hose with caps and vinyl tape, etc. to prevent them from
      being exposed to the atmosphere.
4.    Remove the low-pressure flexible hose mounting bolt (compressor side) and then remove the low-pres-
      sure flexible hose.


                                                       ATC-3
                                       REFRIGERANT LINES
     CAUTION:
     Seal the connecting points of the hose with caps and vinyl tape, etc. to prevent them from being
     exposed to the atmosphere.
5.   Remove the front bumper and air guide (RH). Refer to EI-4, "FRONT BUMPER" on ESM.
6.   Remove the high-pressure pipe mounting bolt (liquid tank side) and then remove the high-pressure pipe.
     CAUTION:
     Seal the connecting points of the pipe with caps and vinyl tape, etc. to prevent them from being
     exposed to the atmosphere.
7.   Remove the high-pressure flexible hose mounting bolts and then remove the high-pressure flexible hose.
     CAUTION:
     Seal the connecting points of the hoses with caps and vinyl tape, etc. to prevent them from being
     exposed to the atmosphere.
INSTALLATION
CAUTION:
                         To ESM
q  Replace the O-rings on the high-pressure pipe, low-pressure flexible hose, and high-pressure flex-
   ible hose with new ones, and apply compressor lubricant to O-rings before installing.
q  When charging refrigerant, check for refrigerant leaks.


                                                 ATC-4
◦ Jabse Service Manual Search 2026 ◦ Jabse Pravopis ◦ onTap.bg ◦ Other service manual resources online : Fixya ◦ eServiceinfo