Service Manuals, User Guides, Schematic Diagrams or docs for : . Car Manuals Nissan Micra 2003-2006 Approved sma EM-CR-001
<< Back | HomeMost service manuals and schematics are PDF files, so You will need Adobre Acrobat Reader to view : Acrobat Download Some of the files are DjVu format. Readers and resources available here : DjVu Resources
For the compressed files, most common are zip and rar. Please, extract files with Your favorite compression software ( WinZip, WinRAR ... ) before viewing. If a document has multiple parts, You should download all, before extracting.
Good luck. Repair on Your own risk. Make sure You know what You are doing.
Image preview - the first page of the document
>> Download EM-CR-001 documenatation <<
Text preview - extract from the document
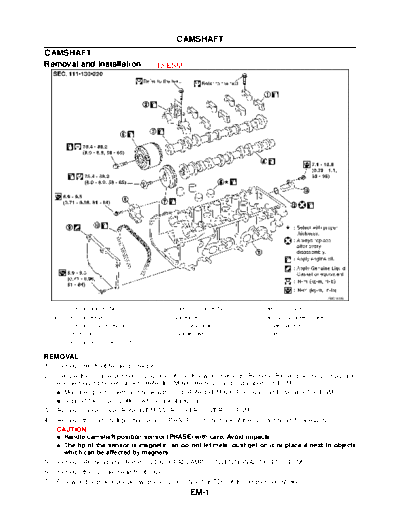
                                                   CAMSHAFT
CAMSHAFT
Removal and Installation                    To ESM


                                                                                                               PBIC1438E


     1.   Camshaft bracket (No. 2 - 5)       2.   Camshaft bracket (No. 1)   3.   Camshaft (intake)
     4.   Camshaft (exhaust)                 5.   Valve lifter               6.   Camshaft sprocket (intake)
     7.   Camshaft sprocket (exhaust)        8.   Chain tensioner            9.   Cylinder head front cover
     10. Timing chain                        11. Cylinder head               12. O-ring
     13. Camshaft position sensor (PHASE)

REMOVAL
1.    Remove RH front fender protector.
2.    Secure the engine position using one of the following methods. Remove RH engine mount stay and
      engine mount bracket (upper). Refer to EM-69, "Removal and Installation" on ESM.
      q Mount engine slingers and hook with hoist. Refer to EM-69, "Removal and Installation" on ESM.

      q Support the oil pan bottom with a jack stand, etc.

3.    Remove rocker cover. Refer to EM-33, "ROCKER COVER" on ESM.
4.    Remove the camshaft position sensor (PHASE) from the back of the cylinder head if necessary.
      CAUTION:
      q Handle camshaft position sensor (PHASE) with care. Avoid impacts.

      q The tip of the sensor is magnetic, so do not let metal dust get on it or place it next to objects
        which can be affected by magnets.
5.    Remove RH headlamp. Refer to LT-6, "HEADLAMP-CONVENTIONAL TYPE" on ESM.
6.    Remove the cylinder head front cover.
7.    Following the procedure below, place cylinder No. 1 at TDC of its compression stroke
                                                         EM-1
                                                CAMSHAFT
a.   Turn the crankshaft pulley clockwise as seen from the engine
     front, and match up the crankshaft pulley TDC mating mark (no
     color) (2) with the timing indicator (1) on the front cover.


                                                                                                PBIC1305E


b.   Confirm mating marks (1) stamped on intake and exhaust
     sprockets are located as shown.
     q If there is no position mark at the position in the figure, turn
       the crankshaft pulley once more to position them as in the fig-
       ure.
c.   Make sure mating marks on intake and exhaust camshaft
     sprockets are located as shown in the figure, then paint mating
     marks on the timing chain links.


                                                                                                PBIC1306E


8.   Make sure the intake camshaft sprocket is in the most advanced position.
     CAUTION:
     Installation and removal of the intake camshaft sprocket must be done in the most advanced posi-
     tion for the following reasons, so make sure you follow the procedure exactly.
     q The sprocket (1) and vane (camshaft coupling) (3) are
        designed to spin and move within the range of a certain
        angle.
     q With the engine stopped the vane (3) is in the most
        retarded position. It will not spin because it is locked to
        the sprocket side by the internal lock pin (2).
     q If the camshaft sprocket mounting bolts are turned in the
        situation described above (the most retarded position),
        the lock pin (2) will become damaged and cause malfunc-
        tions because of the increased horizontal load (cutting
        force) on the lock pin (2).                                                           PBIC1439E


     q Put the intake camshaft sprocket in the most advance position
        in the following steps.
        CAUTION:
        The chain tensioner must not be removed before doing this step.
        NOTE:
        The spinning direction in the following description is as seen from the engine front.
a.   Immobilize the hexagonal part of the camshaft with a wrench (1)
     to prevent the intake camshaft from moving.


                                                                                                PBIC1308E


                                                     EM-2
                                                   CAMSHAFT
b.   Apply air pressure with an air gun (2) to the advanced angle side
     oil passage of the intake valve timing control on the top surface
     of the No. 1 camshaft bracket (1).
        Compression pressure
            : 300 kPa (3.00 bar, 3 kg/cm2, 43.5 psi) or more
     NOTE:
     The air pressure is used to move the lock pin into the disengage
     position.
     q Keep applying air pressure until step "e" is completed.
                                                                                                PBIC1309E
     CAUTION:
     q Be sure not to damage the oil passage with the tip of the air gun.

     q Wipe all the oil off on the top surface of the No. 1 camshaft bracket to prevent oil from being
       blown with the air, and the area around the air gun should be covered with a rag when applying
       air pressure. Eye protection should be worn as needed.
c.   Turn the intake camshaft slowly counter-clockwise in direction A
     (towards the intake manifold).
     q Keep the air pressure on.

     CAUTION:
     Also be sure the wrench immobilizing the camshaft does
     not come loose.
d.   While doing the above, once you hear a click (the sound of the
     internal lock pin disengaging) from inside the intake camshaft
     sprocket, start turning the intake camshaft in the opposite direc-
     tion, direction B (clockwise: towards the exhaust manifold) and
                                                                                                               PBIC1440E
     to the most advanced angle position.
     q Keep the air pressure on.

     q If there is no click, as soon as the vane (camshaft coupling) starts moving independently of the cam-
        shaft sprocket, the lock pin has become disengaged.
     q If the lock pin does not become disengaged, shake the wrench immobilizing the camshaft slightly.

     q If this still does not help in disengaging the lock pin, tap the intake camshaft front very lightly with a plas-
        tic hammer.
e.   Once the vane starts to spin and then the camshaft sprocket starts to spin with the camshaft, it has
     reached the most advanced position, so stop.
     q Make sure the most advanced position locating intake valve
       timing control advance mark (1) of vane (3) and alignment
       mark (2) of sprocket (4) as shown in the figure.


                                                                                                               PBIC1634E


                                                        EM-3
                                               CAMSHAFT
9.   Attach the stopper pin (1) such as a paper clip to secure the
     plunger in the full compressed position and remove the chain
     tensioner (2).


                                                                                                          PBIC1312E


10. Keeping the wrench on the camshaft hexagonal part, loosen the
    mounting bolts and remove the intake and exhaust camshaft
    sprockets.
    CAUTION:
    q Make sure the tools do not come in contact with the A/C
      piping.
    q Do not loosen mounting bolts with securing anything
      other than the camshaft hexagonal part or with tension-
      ing the timing chain.
    NOTE:
                                                                                                          EMD0826D
    With the front cover attached, the timing chain and crankshaft
    sprocket will not come off, so there is no need to take steps to maintain the timing chain tension.

     q  The intake camshaft sprocket should be handled with the following precautions in mind.
     CAUTION:
     q When removing intake camshaft sprocket, using adhesive tape or equivalent, prevent vane from
        rotating so that lock pin will not rejoin in the most retarded position.
     q Handle it carefully, and avoid any chance of impact caused by dropping.

     q Do not disassemble. (Do not loosen the four front bolts.)

     NOTE:
     While removing the intake camshaft sprocket, if the lock pin has been rejoined in the most retarded posi-
     tion, do the following to restore it.
a.   Reinstall the intake camshaft sprocket to the intake camshaft and tighten the mounting bolts enough to
     prevent air leaking out when the air pressure is applied later.
     CAUTION:
     To prevent internal lock pin from damaging, keep the torque on the mounting bolts to the mini-
     mum required to prevent air from escaping.
b.   Apply the air pressure, disengage the lock pin following step 8, and turn the vane to the most advanced
     position. (The timing chain need not be attached for this step.)
c.   Remove the intake camshaft sprocket from camshaft.
11. Remove camshaft brackets.
    q Loosen bolts in several steps in reverse order shown in the
      figure.
12. Remove camshaft.
    CAUTION:
    Do not deform or damage intake camshaft rear end signal
    plate.
13. Remove valve lifter.
    q Identify installation position of each valve. Arrange removed
      valve lifters so they cannot be mixed up.                                                           PBIC0969E


INSTALLATION
1.   Install valve lifter.

                                                    EM-4
                                                 CAMSHAFT
     q   Install it in its original positions.
2.   Install camshaft.
     q You can distinguish between the intake and the exhaust by
       looking at the different shapes of the front and rear ends of
       the camshaft.


                                                                           MBIB0204E


     q   Install the camshaft front ends dowel pin hole (1) and dowel
         pin (2) so that they are positioned as shown in the figure.


                                                                           PBIC1316E


3.   Install camshaft brackets.
     q Completely remove any foreign material on bottom surfaces
       of camshaft brackets and top surface of cylinder head.
     q Referring to the marks on top of the camshaft bracket, install
       so that it is in the same position and facing the same direction
       as when removed.


                                                                           MBIB0206E


4.   Tighten camshaft bracket bolts in the following order.
a.   Bolt sizes vary with installation position. Refer to the following
     when installing bolts.
         Bolt color
              1 - 10             : Black
              11, 12             : Gold
b.   First tighten bolts 9 through 12, then tighten bolts 1 through 8 in
     numerical order.
                                                                           PBIC0969E
            : 2.0 N
◦ Jabse Service Manual Search 2026 ◦ Jabse Pravopis ◦ onTap.bg ◦ Other service manual resources online : Fixya ◦ eServiceinfo