Service Manuals, User Guides, Schematic Diagrams or docs for : . Car Manuals Nissan Frontier 1998-2002 Approved Nissan Frontier 2000 KA24DE AT
<< Back | HomeMost service manuals and schematics are PDF files, so You will need Adobre Acrobat Reader to view : Acrobat Download Some of the files are DjVu format. Readers and resources available here : DjVu Resources
For the compressed files, most common are zip and rar. Please, extract files with Your favorite compression software ( WinZip, WinRAR ... ) before viewing. If a document has multiple parts, You should download all, before extracting.
Good luck. Repair on Your own risk. Make sure You know what You are doing.
Image preview - the first page of the document
>> Download AT documenatation <<
Text preview - extract from the document
AUTOMATIC TRANSAXLE GI
SECTION AT MA
EM
LC
EC
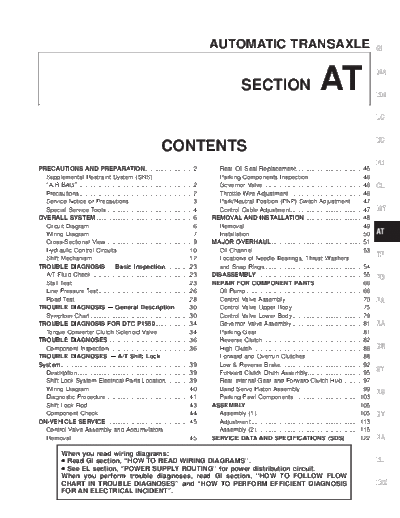
CONTENTS
FE
PRECAUTIONS AND PREPARATION............................2 Rear Oil Seal Replacement.......................................45
Supplemental Restraint System (SRS) Parking Components Inspection................................46
``AIR BAG'' ...................................................................2 Governor Valve ..........................................................46 CL
Precautions ..................................................................2 Throttle Wire Adjustment ...........................................46
Service Notice or Precautions .....................................3 Park/Neutral Position (PNP) Switch Adjustment .......47
Special Service Tools ..................................................4 Control Cable Adjustment..........................................47 MT
OVERALL SYSTEM ........................................................6 REMOVAL AND INSTALLATION ..................................48
Circuit Diagram ............................................................6 Removal.....................................................................49
Wiring Diagram ............................................................7 Installation..................................................................50 AT
Cross-Sectional View...................................................9 MAJOR OVERHAUL .....................................................51
Hydraulic Control Circuits ..........................................10 Oil Channel ................................................................53
Shift Mechanism ........................................................12 Locations of Needle Bearings, Thrust Washers
TF
TROUBLE DIAGNOSIS -- Basic Inspection ..............23 and Snap Rings .........................................................54
A/T Fluid Check .........................................................23 DISASSEMBLY..............................................................55 PD
Stall Test ....................................................................23 REPAIR FOR COMPONENT PARTS............................66
Line Pressure Test.....................................................26 Oil Pump ....................................................................66
Road Test...................................................................28 Control Valve Assembly.............................................70 FA
TROUBLE DIAGNOSIS -- General Description ........30 Control Valve Upper Body .........................................75
Symptom Chart..........................................................30 Control Valve Lower Body .........................................79
TROUBLE DIAGNOSIS FOR DTC P1550....................34 Governor Valve Assembly .........................................81 RA
Torque Converter Clutch Solenoid Valve ..................34 Parking Gear..............................................................81
TROUBLE DIAGNOSES ...............................................36 Reverse Clutch ..........................................................82
Component Inspection...............................................36 High Clutch ................................................................86 BR
TROUBLE DIAGNOSES -- A/T Shift Lock Forward and Overrun Clutches .................................88
System...........................................................................39 Low & Reverse Brake................................................92
Description .................................................................39 Forward Clutch Drum Assembly................................95
ST
Shift Lock System Electrical Parts Location..............39 Rear Internal Gear and Forward Clutch Hub ............97
Wiring Diagram ..........................................................40 Band Servo Piston Assembly ....................................99 RS
Diagnostic Procedure ................................................41 Parking Pawl Components ......................................103
Shift Lock Rod ...........................................................43 ASSEMBLY..................................................................105
Component Check .....................................................44 Assembly (1)............................................................105 BT
ON-VEHICLE SERVICE ................................................45 Adjustment ...............................................................113
Control Valve Assembly and Accumulators Assembly (2)............................................................115
Removal.....................................................................45 SERVICE DATA AND SPECIFICATIONS (SDS) ........122 HA
When you read wiring diagrams:
q Read GI section, ``HOW TO READ WIRING DIAGRAMS''. EL
q See EL section, ``POWER SUPPLY ROUTING'' for power distribution circuit.
When you perform trouble diagnoses, read GI section, ``HOW TO FOLLOW FLOW
CHART IN TROUBLE DIAGNOSES'' and ``HOW TO PERFORM EFFICIENT DIAGNOSIS IDX
FOR AN ELECTRICAL INCIDENT''.
PRECAUTIONS AND PREPARATION
Supplemental Restraint System (SRS)
``AIR BAG''
The Supplemental Restraint System ``AIR BAG'', used along with a seat belt, helps to reduce the risk or
severity of injury to the driver and front passenger in a frontal collision. The Supplemental Restraint System
consists of air bag modules (located in the center of the steering wheel and in the instrument panel on the
passenger side), a diagnosis sensor unit, a crash zone sensor (4WD models), warning lamp, wiring harness,
and spiral cable.
The vehicle is equipped with a passenger air bag deactivation switch. Because no rear seat exists where a
rear-facing child restraint can be placed, the switch is designed to turn off the passenger air bag so that a
rear-facing child restraint can be used in the front passenger seat. The switch is located in the center of the
instrument panel, near the ashtray. When the switch is turned to the ON position, the passenger air bag is
enabled and could inflate in a frontal collision. When the switch is turned to the OFF position, the passenger
air bag is disabled and will not inflate in a frontal collision. A passenger air bag OFF indicator on the instru-
ment panel lights up when the passenger air bag is switched OFF. The driver air bag always remains enabled
and is not affected by the passenger air bag deactivation switch.
Information necessary to service the system safely is included in the RS section of this Service Manual.
WARNING:
q To avoid rendering the SRS inoperative, which could increase the risk of personal injury or death
in the event of a collision which would result in air bag inflation, all maintenance should be per-
formed by an authorized NISSAN dealer.
q Improper maintenance, including incorrect removal and installation of the SRS, can lead to per-
sonal injury caused by unintentional activation of the system.
q Do not use electrical test equipment on any circuit related to the SRS unless instructed to in this
Service Manual. SRS wiring harnesses are covered with yellow insulation either just before the
harness connectors or on the complete harness, for easy identification.
q The vehicle is equipped with a passenger air bag deactivation switch which can be operated by
the customer. When the air bag is switched OFF, the passenger air bag is disabled and will not
inflate in a frontal collision. When the passenger air bag is switched ON, the passenger air bag is
enabled and could inflate in a frontal collision. After SRS maintenance or repair, make sure the
passenger air bag deactivation switch is in the same position (ON or OFF) as when the vehicle
arrived for service.
Precautions
q Before proceeding with disassembly, thoroughly q Properly installed valves, sleeves, plugs, etc.
clean the outside of the transmission. It is impor- will slide along their bores in the valve body
tant to prevent the internal parts from becoming under their own weight.
contaminated by dirt or other foreign matter. q Before assembly, apply a coat of recommended
q Disassembly should be done in a clean work ATF to all parts. Apply petroleum jelly to protect
area. O-rings and seals, or hold small bearings and
q Use lint-free cloth or towels for wiping parts washers in place during assembly. Do not use
clean. Common shop rags can leave fibers that grease.
could interfere with the operation of the trans- q Extreme care should be taken to avoid damage
mission. to O-rings, seals and gaskets when assembling.
q Place disassembled parts in order for easier and q If A/T fluid contains frictional material (clutches,
proper assembly. bands, etc.), replace radiator and flush cooler
q All parts should be carefully cleaned with a gen- line using cleaning solvent and compressed air
eral purpose, non-flammable solvent before after repair of A/T. Refer to LC section
inspection or reassembly. (``Radiator'', ``ENGINE COOLING SYSTEM'').
q Gaskets, seals and O-rings should be replaced q After overhaul, refill the transmission with new
anytime the transmission is disassembled. ATF.
q The valve body contains precision parts and q When the A/T drain plug is removed, only some
requires extreme care when parts are removed of the fluid is drained. Old A/T fluid will remain
and serviced. Place removed parts in order, on in torque converter and ATF cooling system.
a parts rack, so they can be put back in the Always follow the procedures under ``Changing
valve body in the same positions and A/T Fluid'' in the MA section when changing A/T
sequences. Care will also prevent springs and fluid.
small parts from becoming scattered or lost.
AT-2
PRECAUTIONS AND PREPARATION
Service Notice or Precautions GI
TORQUE CONVERTER SERVICE
The torque converter should be replaced under any of the following conditions: MA
q External leaks in the hub weld area.
q Converter hub is scored or damaged.
q Converter pilot is broken, damaged or fits poorly into crankshaft. EM
q Steel particles are found after flushing the cooler and cooler lines.
q Pump is damaged or steel particles are found in the converter.
q Vehicle has TCC shudder and/or no TCC apply. Replace only after all hydraulic and electrical diagnoses LC
have been made. (Converter clutch material may be glazed.)
q Converter is contaminated with engine coolant containing antifreeze.
q Internal failure of stator roller clutch. EC
q Heavy clutch debris due to overheating (blue converter).
q Steel particles or clutch lining material found in fluid filter or on magnet when no internal parts in unit are
worn or damaged -- indicates that lining material came from converter. FE
The torque converter should not be replaced if:
q The fluid has an odor, is discolored, and there is no evidence of metal or clutch facing particles.
q The threads in one or more of the converter bolt holes are damaged. CL
q Transmission failure did not display evidence of damaged or worn internal parts, steel particles or clutch
plate lining material in unit and inside the fluid filter.
q Vehicle has been exposed to high mileage (only). The exception may be where the torque converter clutch MT
dampener plate lining has seen excess wear by vehicles operated in heavy and/or constant traffic, such
as taxi, delivery or police use.
AT
ATF COOLER SERVICE
If A/T fluid contains frictional material (clutches, bands, etc.), replace radiator and flush cooler line using
cleaning solvent and compressed air after repair of A/T. Refer to LC section (``Radiator'', ``ENGINE COOLING TF
SYSTEM'').
PD
FA
RA
BR
ST
RS
BT
HA
EL
IDX
AT-3
PRECAUTIONS AND PREPARATION
Special Service Tools
The actual shapes of Kent-Moore tools may differ from those of special service tools illustrated here.
Tool number
(Kent-Moore No.) Description
Tool name
(J34301-C) Measuring line pressure and governor
Oil pressure gauge set pressure
1 (J34301-1)
Oil pressure gauge
2 (J34301-2)
Hose
3 (J34298)
Joint pipe
4 (J34282-2)
Adapter
5 (790-301-1230-A)
60◦ Jabse Service Manual Search 2026 ◦ Jabse Pravopis ◦ onTap.bg ◦ Other service manual resources online : Fixya ◦ eServiceinfo