Service Manuals, User Guides, Schematic Diagrams or docs for : . Car Manuals Subaru Forester 1999-2004 Approved Subaru Forester 1999-2000 BODY AND ELECTRICAL SECTION Seats, Seat Belts and Interior MSA5T0126A27916
<< Back | HomeMost service manuals and schematics are PDF files, so You will need Adobre Acrobat Reader to view : Acrobat Download Some of the files are DjVu format. Readers and resources available here : DjVu Resources
For the compressed files, most common are zip and rar. Please, extract files with Your favorite compression software ( WinZip, WinRAR ... ) before viewing. If a document has multiple parts, You should download all, before extracting.
Good luck. Repair on Your own risk. Make sure You know what You are doing.
Image preview - the first page of the document
>> Download MSA5T0126A27916 documenatation <<
Text preview - extract from the document
SERVICE PROCEDURE [W5A2] 5-3
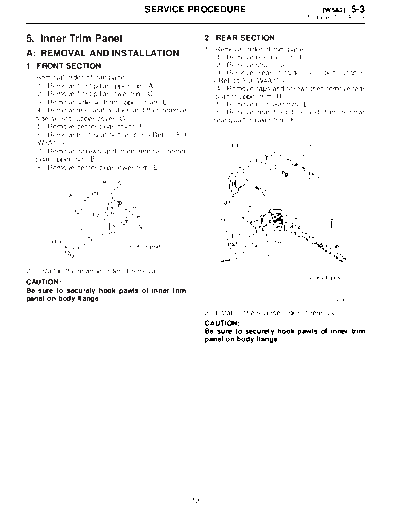
5. Inner Trim Panel
5. Inner Trim Panel 2. REAR SECTION
1) Removal order of trim panel:
A: REMOVAL AND INSTALLATION (1) Remove rear rail trim (I).
1. FRONT SECTION (2) Remove strut cover (J).
(3) Remove rear outside seat belt anchor.
1) Removal order of trim panel:
(1) Remove front pillar upper trim (A). (4) Remove caps and screws then remove rear
(2) Remove front pillar lower trim (C). quarter upper trim (H).
(3) Remove side sill front upper cover (D). (5) Remove rear skirt trim (L).
(4) Remove rear seat cushion and then remove (6) Remove rear floor box and then remove
side sill rear upper cover (G). rear quarter lower trim (K).
(5) Remove center pillar cover (F).
(6) Remove front seat belt anchor.
(7) Remove screws and then remove center
pillar upper trim (B).
(8) Remove center pillar lower trim (E).
S5M0238A
2) Install in the reverse order of removal.
CAUTION:
Be sure to securely hook pawls of inner trim
panel on body flange. S5M0412A
2) Install in the reverse order of removal.
CAUTION:
Be sure to securely hook pawls of inner trim
panel on body flange.
13
5-3 [W5A3] SERVICE PROCEDURE
5. Inner Trim Panel
3. FLOOR SECTION (1) Remove clips and then detach rear floor
boxes.
1) Removal order of floor mat:
(1) Remove front seats.
(2) Remove rear seat cushion.
(3) Remove console box, depending on the
specifications.
(4) Remove front pillar lower trim panel.
(5) Remove center pillar lower trim panel.
(6) Remove side sill cover.
(7) Remove clips from floor mat. (2) Install in the reverse order of removal.
NOTE: 4. ROOF TRIM
When pulling out edge, do not pull mat alone; pull
mat together with edge. Pry off two steel clips on 1) Remove head console.
side sill front cover and one on side sill rear cover
using screwdriver.
(8) Remove mat hook.
(9) Remove mat from toe board area.
(10) Remove mat from rear heater duct.
(11) Roll mat, and take it out of opened rear
door.
S5M0243
2) Remove sunvisor and assist rail.
3) Remove front pillar upper trim and center pillar
upper trim , rear quarter
upper trim and rear rail trim.
4) Detach sunroof garnish (A). (Sunroof equipped
model)
S5M0240
(12) Install in the reverse order of removal.
NOTE:
◦ Jabse Service Manual Search 2026 ◦ Jabse Pravopis ◦ onTap.bg ◦ Other service manual resources online : Fixya ◦ eServiceinfo