Service Manuals, User Guides, Schematic Diagrams or docs for : . Car Manuals Subaru Forester 1999-2004 Approved Subaru Forester 2003 `03 for3_trans_2-3
<< Back | HomeMost service manuals and schematics are PDF files, so You will need Adobre Acrobat Reader to view : Acrobat Download Some of the files are DjVu format. Readers and resources available here : DjVu Resources
For the compressed files, most common are zip and rar. Please, extract files with Your favorite compression software ( WinZip, WinRAR ... ) before viewing. If a document has multiple parts, You should download all, before extracting.
Good luck. Repair on Your own risk. Make sure You know what You are doing.
Image preview - the first page of the document
>> Download for3_trans_2-3 documenatation <<
Text preview - extract from the document
HIGH CLUTCH AND REVERSE CLUTCH
AUTOMATIC TRANSMISSION
35.High Clutch and Reverse 12) Take out the high clutch hub and thrust bear-
ing.
Clutch
A: REMOVAL
1) Remove the transmission assembly from vehi-
cle.
2) Extract the torque converter clutch assembly.
3) Remove the input shaft.
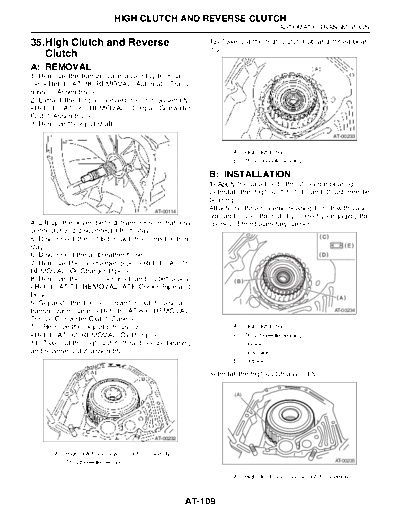
AT-00233
(A) High clutch hub
(B) Thrust needle bearing
B: INSTALLATION
1) Apply the vaseline to thrust needle bearing.
2) Install the high clutch hub and thrust needle
bearing.
AT-00114
Attach the thrust needle bearing to hub with vase-
line and install the hub by correctly engaging the
4) Lift-up the lever behind transmission harness splines of front planetary carrier.
connector and disconnect it from stay.
5) Disconnect the inhibitor switch connector from
stay.
6) Disconnect the air breather hose.
7) Remove the oil charger pipe.
8) Remove the oil cooler inlet and outlet pipes.
9) Separate the torque converter clutch case and
transmission case.
10) Remove the oil pump housing. (A) High clutch hub
(B) Thrust needle bearing
11) Take out the high clutch, thrust needle bearing (C) Upside
and reverse clutch assembly. (D) Downside
(E) Outside
3) Install the high clutch assembly.
(A)
AT-00232
(A) High clutch and reverse clutch assembly
(B) Thrust needle bearing AT-00235
(A) High clutch and reverse clutch assembly
AT-109
HIGH CLUTCH AND REVERSE CLUTCH
AUTOMATIC TRANSMISSION
4) Adjust the total end play. hand. At this time, not to damage the bushing.
5) Install the thrust needle bearing in proper direc-
Normal protrusion A:
tion.
50 -- 55 mm (1.97 -- 2.17 in)
AT-00312
AT-00291
(A) High clutch and reverse clutch ASSY 13) Install the torque converter clutch assembly.
(B) Thrust needle bearing
(D) Down side 14) Install the transmission assembly to vehicle.
(E) Outside
6) Install the oil pump housing assembly.
7) Install the torque converter clutch case assem- C: DISASSEMBLY
bly to transmission case assembly. plate, drive plates, driven plates.
8) Insert the inhibitor switch and transmission con-
nector into stay.
9) Install the air breather hose.
AT-00236
(A) Snap ring
2) Remove the snap ring, and take out the retaining
AT-00174
plate, drive plates and driven plates.
(A) Transmission harness
(B) Inhibitor switch harness
10) Install the oil cooler pipes.
11) Install the oil charger pipe with O-ring.
AT-00237
(A) Snap ring
AT-110
HIGH CLUTCH AND REVERSE CLUTCH
AUTOMATIC TRANSMISSION
3) Using the ST1 and ST2, remove the snap ring. D: ASSEMBLY
ST1 398673600 COMPRESSOR 1) Install the seal rings and lip seal to high clutch
ST2 498627100 SEAT piston and reverse clutch piston.
2) Install the high clutch piston to reverse clutch
piston.
AT-00238
(A) Snap ring AT-00240
4) Take out the clutch cover, spring retainer, high
(A) High clutch piston
clutch piston and reverse clutch piston.
(B) Reverse clutch piston
3) Install the reverse clutch to high clutch drum.
Align the groove on the reverse clutch piston with
the groove on high clutch drum during installation.
AT-00239
(A) Reverse clutch piston
(B) Cover
(C) Return spring AT-00241
5) Remove the seal rings and lip seal from high
(A) Reverse clutch piston
clutch piston and reverse clutch piston.
(B) High clutch drum
4) Install the spring retainer to high clutch piston.
AT-00240
(A) High clutch piston AT-00242
(B) Reverse clutch piston
(A) Return spring
(B) High clutch drum
AT-111
HIGH CLUTCH AND REVERSE CLUTCH
AUTOMATIC TRANSMISSION
5) Install the ST to high clutch piston. 10) Apply compressed air intermittently to check for
ST 498437000 HIGH CLUTCH PISTON operation.
GAUGE
AT-00246
AT-00243
11) Measure the clearance between retaining plate
6) Avoid tolding the high clutch piston seal, when and snap ring.
7) Using the ST1 and ST2, install the snap ring. 12) Install the driven plate, drive plate, retaining
ST1 398673600 COMPRESSOR plate and snap ring.
ST2 498627100 SEAT
ST3 498437000 HIGH CLUTCH PISTON
GAUGE
AT-00247
13) Apply compressed air intermittently to check for
operation.
AT-00244
8) Install the thickest driven plate to piston side,
and then install the driven plate, drive plate, retain-
ing plate to high clutch drum.
AT-00248
14) Measure the clearance between retaining plate
and snap ring.
AT-00245
E: INSPECTION
9) Install the snap ring to high clutch drum. 1) Inspect the fllowing items.
◦ Jabse Service Manual Search 2026 ◦ Jabse Pravopis ◦ onTap.bg ◦ Other service manual resources online : Fixya ◦ eServiceinfo