Service Manuals, User Guides, Schematic Diagrams or docs for : . Car Manuals Subaru Impreza 2001-2002.2004-2007 Approved Subaru Impreza 2004 WRX STi 06. BODY 02. HVAC SYSTEM (AUTO AC) (DIAGNOSTICS) 07. Diagnostic Procedure for Actuators
<< Back | HomeMost service manuals and schematics are PDF files, so You will need Adobre Acrobat Reader to view : Acrobat Download Some of the files are DjVu format. Readers and resources available here : DjVu Resources
For the compressed files, most common are zip and rar. Please, extract files with Your favorite compression software ( WinZip, WinRAR ... ) before viewing. If a document has multiple parts, You should download all, before extracting.
Good luck. Repair on Your own risk. Make sure You know what You are doing.
Image preview - the first page of the document
>> Download 07. Diagnostic Procedure for Actuators documenatation <<
Text preview - extract from the document
DIAGNOSTIC PROCEDURE FOR ACTUATORS
HVAC SYSTEM (AUTO A/C) (DIAGNOSTICS)
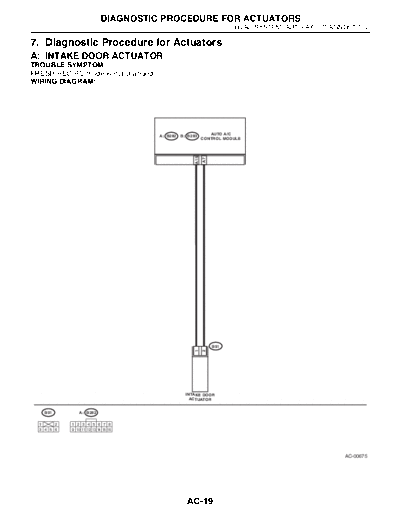
7. Diagnostic Procedure for Actuators
A: INTAKE DOOR ACTUATOR
TROUBLE SYMPTOM:
FRESH/RECIRC mode is not changed.
WIRING DIAGRAM:
AUTO A/C
A: B282 B: B283
CONTROL MODULE
A15
A7
B91
1
2
INTAKE DOOR
ACTUATOR
B91 A: B282
1 2 1 2 3 4 5 6 7 8
3 4 5 6 9 10 11 12 13 14 15 16
AC-00675
AC-19
DIAGNOSTIC PROCEDURE FOR ACTUATORS
HVAC SYSTEM (AUTO A/C) (DIAGNOSTICS)
Step Check Yes No
1 CHECK FUSE. Is the fuse blown-out? Replace the fuse. Go to step 2.
1)Remove the No. 17 fuse in fuse & relay box.
2)Check the condition of fuse.
2 CHECK SIGNAL VOLTAGE. Is the voltage less than 1 V? Go to step 3. Repair the short
1)Change the air intake to RECIRC by pushing circuit in harness
FRESH/RECIRC switch. for power supply
2)Measure the voltage between A/C control line.
module and chassis ground.
Connector & terminal
(B282) No. 15 (+) -- Chassis ground (-):
3 CHECK SIGNAL VOLTAGE. Is the voltage less than 1 V? Go to step 4. Repair the short
1)Change the air intake to FRESH with push- circuit in harness
ing FRESH/RECIRC switch. for power supply
2)Measure the voltage between A/C control line.
module and chassis ground.
Connector & terminal
(B282) No. 7 (+) -- Chassis ground (-):
4 CHECK HARNESS CONNECTOR BETWEEN Is the resistance less than 1 Go to step 5. Repair the open
A/C CONTROL MODULE AND FRESH/RE- ? circuit in harness
CIRC ACTUATOR. between A/C con-
1)Turn the ignition switch to OFF. trol module and
2)Disconnect the connector from A/C control intake door actua-
module and intake door actuator. tor.
3)Measure the resistance of harness between
A/C control module and intake door actuator.
Connector & terminal
(B282) No. 15 -- (B91) No. 1:
5 CHECK HARNESS CONNECTOR BETWEEN Is the resistance less than 1 Go to step 6. Repair the open
A/C CONTROL MODULE AND FRESH/RE- ? circuit in harness
CIRC ACTUATOR. between A/C con-
Measure the resistance of harness between A/C trol module and
control module and intake door actuator. intake door actua-
Connector & terminal tor.
(B282) No. 7 -- (B91) No. 2:
6 CHECK POOR CONTACT. Is there poor contact in con- Repair the con- Replace the A/C
Check poor contact in A/C control module con- nector? nector. control module.
nector.
AC-20
DIAGNOSTIC PROCEDURE FOR ACTUATORS
HVAC SYSTEM (AUTO A/C) (DIAGNOSTICS)
B: MODE DOOR ACTUATOR
TROUBLE SYMPTOM:
Air flow outlet is not changed.
WIRING DIAGRAM:
AUTO A/C
A: B282 B: B283
CONTROL MODULE
A12
B12
B6
B77
1
3
2
E
MODE DOOR ACTUATOR
B77 A: B282 B: B283
1 1 2 3 4 5 6 7 8 1 2 3 4 5 6 7 8 9 10
2 9 10 11 12 13 14 15 16 11 12 13 14 15 16 17 18 19 20
3
AC-00676
AC-21
DIAGNOSTIC PROCEDURE FOR ACTUATORS
HVAC SYSTEM (AUTO A/C) (DIAGNOSTICS)
Step Check Yes No
1 CHECK POWER SUPPLY FOR AUTO A/C Is the voltage more than 10 V? Go to step 2. Replace the auto
CONTROL MODULE SIDE. A/C control mod-
1)Turn the ignition switch to ON. ule.
2)Turn the A/C switch to ON.
3)Measure the voltage between auto A/C con-
trol module harness connector terminal and
chassis ground.
Connector & terminal
(B283) No. 6 (+) -- Chassis ground (-):
2 CHECK POWER SUPPLY FOR ACTUATOR Is the voltage more than 10 V? Go to step 3. Repair the open
SIDE. circuit in harness
Measure the voltage between mode door actu- between auto A/C
ator harness connector terminal and chassis control module
ground. and mode door
Connector & terminal actuator.
(B77) No. 1 (+) -- Chassis ground (-):
3 CHECK SIGNAL FOR AUTO A/C CONTROL Is the voltage approx. 5.5 V? Go to step 4. Replace the auto
MODULE SIDE. A/C control mod-
Measure the voltage between auto A/C control ule.
module harness connector terminal and chas-
sis ground with oscilloscope.
Connector & terminal
(B282) No. 12 (+) -- Chassis ground (-):
4 CHECK SIGNAL FOR ACTUATOR SIDE. Is the voltage approx. 5.5 V? Go to step 5. Repair the open
Measure the voltage between mode door actu- circuit in harness
ator harness connector terminal and chassis between auto A/C
ground. control module
Connector & terminal and mode door
(B77) No. 3 (+) -- Chassis ground (-): actuator.
5 CHECK GROUND CIRCUIT OF ACTUATOR. Is the resistance less than 1 Go to step 6. Repair the open
1)Turn the ignition switch and A/C switch to ? circuit in harness
OFF. between mode
2)Measure the resistance between mode door door actuator and
actuator harness connector terminal and chas- chassis ground.
sis ground.
Connector & terminal
(B77) No. 2 -- Chassis ground:
6 CHECK POOR CONTACT. Is there poor contact in con- Repair the con- Replace the A/C
Check poor contact in auto A/C control module nector? nector. control module.
connector.
AC-22
DIAGNOSTIC PROCEDURE FOR ACTUATORS
HVAC SYSTEM (AUTO A/C) (DIAGNOSTICS)
C: AIR MIX DOOR ACTUATOR
TROUBLE SYMPTOM:
Outlet air temperature is not changed.
WIRING DIAGRAM:
AUTO A/C
A: B282 B: B283
CONTROL MODULE
B12
B5
A4
B293
1
3
2
E
AIR MIX DOOR ACTUATOR
B293 A: B282 B: B283
1 1 2 3 4 5 6 7 8 1 2 3 4 5 6 7 8 9 10
2 9 10 11 12 13 14 15 16 11 12 13 14 15 16 17 18 19 20
3
AC-00677
AC-23
DIAGNOSTIC PROCEDURE FOR ACTUATORS
HVAC SYSTEM (AUTO A/C) (DIAGNOSTICS)
Step Check Yes No
1 CHECK POWER SUPPLY FOR AUTO A/C Is the voltage more than 10 V? Go to step 2. Replace the auto
CONTROL MODULE SIDE. A/C control mod-
1)Turn the ignition switch to ON. ule.
2)Turn the A/C switch to ON.
3)Measure the voltage between auto A/C con-
trol module harness connector terminal and
chassis ground.
Connector & terminal
(B283) No. 5 (+) -- Chassis ground (-):
2 CHECK POWER SUPPLY FOR ACTUATOR Is the voltage more than 10 V? Go to step 3. Repair the open
SIDE. circuit in harness
Measure the voltage between air mix door between auto A/C
actuator harness connector terminal and chas- control module
sis ground. and air mix door
Connector & terminal actuator.
(B293) No. 1 (+) -- Chassis ground (-):
3 CHECK SIGNAL FOR AUTO A/C CONTROL Is the voltage approx. 5.5 V? Go to step 4. Replace the auto
MODULE SIDE. A/C control mod-
Measure the voltage between auto A/C control ule.
module harness connector terminal and chas-
sis ground with oscilloscope.
Connector & terminal
(B282) No. 4 (+) -- Chassis ground (-):
4 CHECK SIGNAL FOR ACTUATOR SIDE. Is the voltage approx. 5.5 V? Go to step 5. Repair the open
Measure the voltage between air mix door circuit in harness
actuator harness connector terminal and chas- between auto A/C
sis ground with oscilloscope. control module
Connector & terminal and air mix door
(B293) No. 3 (+) -- Chassis ground (-): actuator.
5 CHECK GROUND CIRCUIT OF ACTUATOR. Is the resistance less than 1 Go to step 6. Repair the open
1)Turn the ignition switch and A/C switch to ? circuit in harness
OFF. between air mix
2)Measure the resistance between air mix door door actuator and
actuator harness connector terminal and chas- chassis ground.
sis ground.
Connector & terminal
(B293) No. 2 -- Chassis ground:
6 CHECK POOR CONTACT. Is there poor contact in con- Repair the con- Replace the A/C
Check poor contact in auto A/C control module nector? nector. control module.
connector.
AC-24
◦ Jabse Service Manual Search 2026 ◦ Jabse Pravopis ◦ onTap.bg ◦ Other service manual resources online : Fixya ◦ eServiceinfo