Service Manuals, User Guides, Schematic Diagrams or docs for : . Car Manuals Toyota Celica 1988-1989.1993-1994.2000 Approved Toyota Celica 1989 steering column fixed
<< Back | HomeMost service manuals and schematics are PDF files, so You will need Adobre Acrobat Reader to view : Acrobat Download Some of the files are DjVu format. Readers and resources available here : DjVu Resources
For the compressed files, most common are zip and rar. Please, extract files with Your favorite compression software ( WinZip, WinRAR ... ) before viewing. If a document has multiple parts, You should download all, before extracting.
Good luck. Repair on Your own risk. Make sure You know what You are doing.
Image preview - the first page of the document

>> Download steering column fixed documenatation <<
Text preview - extract from the document
                               STEERING COLUMN - FIXED

                                      1988 Toyota Celica


         1988 STEERING
         Toyota - Steering Columns - Non-Tilt Wheel

         All Models

    DESCRIPTION
         Steering column is a collapsible 2-piece design. Columns use
shear pins to absorb collision impact. Steering shaft is connected
directly to steering gear with either a flexible coupling or "U"
joint.

NOTE:   For models with tilt wheel steering columns, see
        STEERING COLUMN - TILT article in this section.

    REMOVAL & INSTALLATION

    STEERING COLUMN
         Removal
         1) Disconnect battery ground cable. Remove horn pad and
steering wheel. Mark steering shaft and wheel for installation.
Remove steering wheel.
         2) Remove dash panels and pads (if necessary). On models
equipped with A/C, remove air duct from under steering column. Remove
column bracket covers.


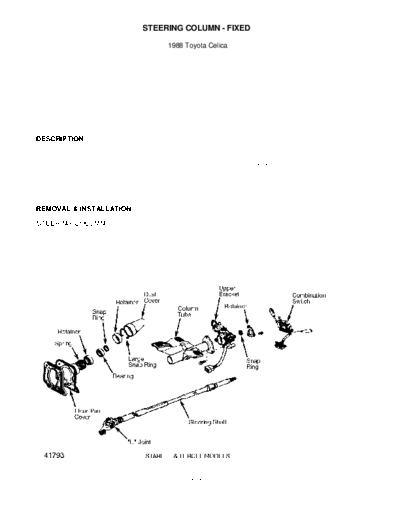
Fig. 1: Exploded View of Passenger Car Steering Column
Courtesy of Toyota Motor Sales, U.S.A., Inc.

         3) Remove combination switch. Mark "U" joint and shaft for
installation. On passenger car models, disconnect steering shaft "U"
joint from steering gear in engine compartment.
         4) On Land Cruiser, Pickup, Van and 4Runner models,
disconnect "U" joint from lower steering shaft. Disconnect column
shifter linkage (if equipped).
         5) Remove bolts from column hole cover. Remove column support
bracket bolts. Remove steering column from vehicle.

         Installation
         1) Install steering column in vehicle. Tighten column bracket
bolts finger tight. Install column hole cover bolts. Tighten column
bracket bolts.
         2) Attach column shift linkage (if equipped). Aligning marks
made during removal on "U" joints, tighten clamp bolts. Install
combination switch.
         3) Install bracket covers, dash panels and pads. Install air
ducts (if equipped). Align marks made during removal, install steering
wheel and horn pad.


Fig. 2: Exploded View of Land Cruiser, Pickup, Van & 4Runner
Steering Column
Courtesy of Toyota Motor Sales, U.S.A., Inc.
Fig. 3: Exploded View of Column Shift Steering Column
Courtesy of Toyota Motor Sales, U.S.A., Inc.

    OVERHAUL

    STEERING COLUMN
         Disassembly
         Remove ignition key cylinder. Remove column shift assembly
from steering column. Remove clamp bolt and lower steering shaft.
Remove hole cover from column. Remove snap ring from upper steering
shaft.
         Inspection
         Check upper bracket for damage and upper bearing for rotating
smoothness. Check steering shafts for bending, damaged splines or
damaged "U" joints. Check column tube for bending or other damage.
Repair or replace components as necessary.

         Reassembly
         Reassemble in reverse order of disassembly procedures. Ensure
all bushings, bearings, shims and bolts are not damaged or worn. If
damaged or worn, replace with new units.

        TORQUE SPECIFICATIONS
TORQUE SPECIFICATIONS TABLE
◦ Jabse Service Manual Search 2024 ◦ Jabse Pravopis ◦ onTap.bg ◦ Other service manual resources online : Fixya ◦ eServiceinfo