Service Manuals, User Guides, Schematic Diagrams or docs for : . Car Manuals Toyota Celica 1988-1989.1993-1994.2000 Approved Toyota Celica 1993 STEERING
<< Back | HomeMost service manuals and schematics are PDF files, so You will need Adobre Acrobat Reader to view : Acrobat Download Some of the files are DjVu format. Readers and resources available here : DjVu Resources
For the compressed files, most common are zip and rar. Please, extract files with Your favorite compression software ( WinZip, WinRAR ... ) before viewing. If a document has multiple parts, You should download all, before extracting.
Good luck. Repair on Your own risk. Make sure You know what You are doing.
Image preview - the first page of the document
>> Download STEERING documenatation <<
Text preview - extract from the document
STEERING COLUMN - AUTOMATIC TILT WHEEL
1993 Toyota Celica
1993 STEERING
Toyota - Steering Columns - Automatic Tilt Wheel
Celica All-Trac
DESCRIPTION & OPERATION
Automatic tilt steering column uses a standard tilt steering
column with a motor located in the column housing. The motor allows
the column to automatically swing up when the ignition key is removed
for easier exit and entry to the vehicle. When the key is inserted in
the ignition and the steering wheel is pulled down, it will
automatically return to the pre-set position.
The position of the wheel can be adjusted by pulling the lock
release knob, placing the wheel in the desired position and releasing
the knob. An unlock warning switch is located in the ignition key
cylinder and a tilt steering ECU is located behind the instrument
panel above the glove box.
NOTE: For Adjustments and Removal and Installation of steering
wheel pad, combination switch, ignition switch and Overhaul
of steering column see STEERING COLUMN - TILT
article in the STEERING section.
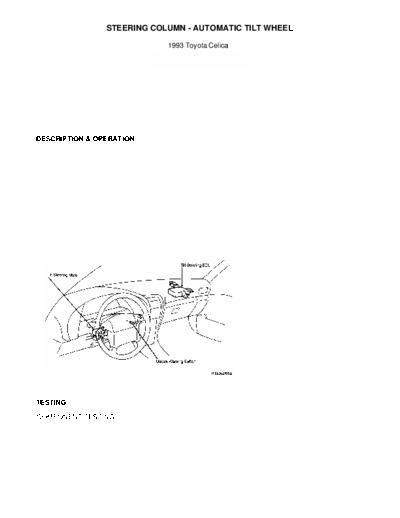
Fig. 1: Locating Celica All-Trac Auto Tilt Wheel Steer Col Components
Courtesy of Toyota Motor Sales, U.S.A., Inc.
TESTING
COMPONENT TESTING
Tilt Steering Motor
1) Disconnect tilt motor electrical connector. Connect
positive lead from battery to connector terminal TiM+ and negative
lead to terminal TiM-. Motor arm should move away from housing.
Reverse battery leads to terminals. Motor arm should move toward
housing. If motor does operate as specified, replace motor. See
Fig. 2.
Fig. 2: Tilt Steering Motor Test
Courtesy of Toyota Motor Sales, U.S.A., Inc.
Tilt Steering ECU
1) Place ignition key in ignition switch. Remove glove box to
gain access to ECU. Connect positive voltmeter lead to ECU terminal
TiM+ and negative lead to GRD terminal. See Fig. 3. Check that meter
needle jumps once to approximately 10 volts when the key is removed
from ignition.
2) Connect voltmeter positive lead to ECU terminal TiM- and
negative led to GRD terminal. Check that meter needle jumps once to
approximately 10 volts when key is inserted in ignition.
3) Connect positive lead from battery to ECU terminal lead
IGSW and negative lead to GRD terminal. Check that tilt-away feature
does not operate when key is removed from ignition. If ECU operation
is not as specified, replace ECU.
Fig. 3: Tilt Steering ECU Test
Courtesy of Toyota Motor Sales, U.S.A., Inc.
Key Unlock Warning Switch
Using ohmmeter, check for continuity between terminals 1 and
5 of ignition switch. With ignition key removed, there should be no
continuity. With ignition key installed there should be continuity. If
continuity is not as specified, replace unlock switch.
SYSTEM TESTING
1) Check battery voltage. If less than 8 volts, check battery
and charging system. If more than 8 volts, check POWER fuse in fuse
block. If fuse is blown, replace fuse and check auto-tilt operation.
If system does not operate, check for short circuit in wire harness
between fuse and tilt ECU terminal B+. If fuse is okay, but system
does not operate, disconnect tilt ECU connector.
2) Using volt-ohmmeter, check for battery voltage between
terminal B+ and body ground. See Fig. 4. If voltage is okay, go to
next step. If voltage is not okay, check for open circuit between fuse
and terminal B+
3) Using volt-ohmmeter, check for continuity between terminal
GND and body ground. If continuity exists, go to next step. If no
continuity, check body ground, or for open circuit between terminal
GND and ground.
4) Check for continuity between terminal UWSW and GND. There
should be no continuity with ignition key removed, and continuity with
key inserted in ignition switch. If continuity is okay, go to next
step. If continuity is not as specified, check for open circuit
between terminal UWSW and unlock warning switch. If circuit is okay,
replace unlock warning switch.
5) Check for voltage between terminals IGSW and GND. With
ignition switch on, battery voltage should be present. With switch
off, 0 volts should be present. If voltage is okay, go to next step.
If voltage is not as specified, check for open circuit between
terminal IGSW and ignition switch.
6) Check for continuity between terminals TiM+ and TiM-. If
continuity exists, check ECU. See Tilt Steering ECU under
COMPONENT TESTING. If ECU fails test, replace ECU. If continuity does
not exist, check for open circuit between terminals TiM+ and TiM-. If
circuit is okay, check tilt motor. See Tilt Steering Motor under
COMPONENT TESTING. If motor fails test, replace motor.
Fig. 4: Tilt Steering ECU Connector Terminal Identification
Courtesy of Toyota Motor Sales, U.S.A., Inc.
WIRING DIAGRAMS
Fig. 5: Automatic Tilt Wheel Steering Column Wiring Diagram
◦ Jabse Service Manual Search 2026 ◦ Jabse Pravopis ◦ onTap.bg ◦ Other service manual resources online : Fixya ◦ eServiceinfo