Service Manuals, User Guides, Schematic Diagrams or docs for : . Car Manuals Toyota Celica 1988-1989.1993-1994.2000 Approved Toyota Celica 2000 Toyota Celica 2000 Service Manual Braking ARTICLE_PBRAKE_ADJUSTMENT_EXTERNAL
<< Back | HomeMost service manuals and schematics are PDF files, so You will need Adobre Acrobat Reader to view : Acrobat Download Some of the files are DjVu format. Readers and resources available here : DjVu Resources
For the compressed files, most common are zip and rar. Please, extract files with Your favorite compression software ( WinZip, WinRAR ... ) before viewing. If a document has multiple parts, You should download all, before extracting.
Good luck. Repair on Your own risk. Make sure You know what You are doing.
Image preview - the first page of the document
>> Download ARTICLE_PBRAKE_ADJUSTMENT_EXTERNAL documenatation <<
Text preview - extract from the document
Page 1 of 4
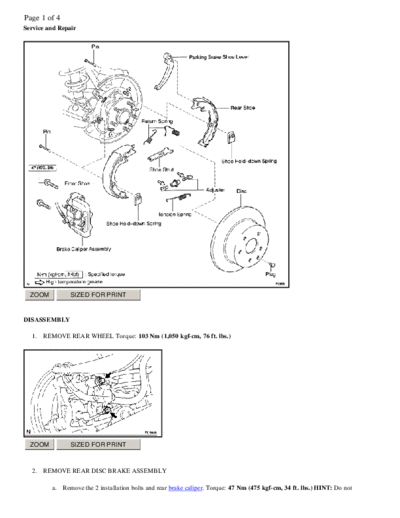
Service and Repair


  ZOOM          SIZED FOR PRINT


DISASSEMBLY

  1.   REMOVE REAR WHEEL Torque: 103 Nm (1,050 kgf-cm, 76 ft. lbs.)


  ZOOM          SIZED FOR PRINT


  2.   REMOVE REAR DISC BRAKE ASSEMBLY

         a.   Remove the 2 installation bolts and rear brake caliper. Torque: 47 Nm (475 kgf-cm, 34 ft. lbs.) HINT: Do not
Page 2 of 4
               disconnect the flexible hose from the brake caliper.
          b.   Suspend the disc brake securely. Ensure that the hose not stretched.


 ZOOM            SIZED FOR PRINT


  3.   REMOVE DISC Release the parking brake lever, and remove the disc. HINT: If the disc cannot be removed easily, turn the
       shoe adjuster until the wheel turns freely.


 ZOOM            SIZED FOR PRINT


  4.   REMOVE SHOE RETURN SPRINGS AND TENSION SPRING Using needle-nose pliers, remove the 2 shoe return springs
       and tension spring.
  5.   REMOVE SHOE STRUT


 ZOOM            SIZED FOR PRINT


  6.   REMOVE FRONT SHOE AND ADJUSTER

          a. Using SST, remove the shoe hold-down spring and pin from the front shoe. SST 09718-00010
          b. Remove the front shoe and adjuster.
Page 3 of 4
  7.   REMOVE REAR SHOE

          a. Using SST, remove the shoe hold-down spring and pin from the rear shoe. SST 09718-00010
          b. Disconnect the rear shoe from the parking brake shoe lever, and remove rear shoe.


 ZOOM           SIZED FOR PRINT


  8.   REMOVE PARKING BRAKE SHOE LEVER Using needle-nose pliers, disconnect the parking brake cable from the parking
       brake shoe lever.

INSPECTION

  1.   INSPECT DISASSEMBLED PARTS Inspect the disassembled parts for wear, rust or damage.


 ZOOM           SIZED FOR PRINT


  2.   MEASURE BRAKE SHOE LINING THICKNESS Using a ruler, measure the thickness of the shoe lining. Standard
       thickness: 2.0 mm (0.079 inch) Minimum thickness: 1.0 mm (0.039 inch) If the lining thickness is at the minimum thickness
       or less, or if there is severe, uneven wear, replace the brake shoe.


 ZOOM           SIZED FOR PRINT
Page 4 of 4
   3.   MEASURE DISC INSIDE DIAMETER Using a brake drum gauge or equivalent, measure the inside diameter of the disc.
        Standard inside diameter: 173.0 mm (6.811 inch) Maximum inside diameter: 174.0 mm (6.850 inch) Replace the disc if the
        inside diameter is at the maximum value or more. Replace the disc or grind it with a lathe if the disc is scored or is worn
        unevenly.


  ZOOM            SIZED FOR PRINT


   4.   INSPECT PARKING BRAKE LINING AND DISC FOR PROPER CONTACT Apply chalk to the inside surface of the disc,
        then grind down the brake shoe lining to fit. If the contact between the disc and the brake shoe lining is improper, repair it
        using a brake shoe grinder or replace the brake shoe assembly.

REASSEMBLY
Reassembly is in the reverse order of disassembly.

NOTICE: Apply high temperature grease to the parts indicated by the arrows.

   1.   ADJUST PARKING BRAKE SHOE CLEARANCE

           a. Temporarily install the hub nuts.
           b. Remove the hole plug.


  ZOOM            SIZED FOR PRINT


           c.   Turn the adjuster and expand the shoes until the disc locks.
           d.   Return the adjuster 8 notches.
           e.   Install the hole plug.

   2.   SETTLING PARKING BRAKE SHOES AND DISC

           a. Drive the vehicle at about 50 km/in (31 mph) on a safe, level and dry road.
           b. With the parking brake release button pushed in, pull on the lever with 98 N (10 kgf, 19.8 lbs) of force.
           c. Drive the vehicle for about 400 meters (0.25 mile) in this condition.
           d. Repeat this procedure 2 or 3 times.

   3.   CHECK AND ADJUST PARKING BRAKE LEVER TRAVEL
◦ Jabse Service Manual Search 2026 ◦ Jabse Pravopis ◦ onTap.bg ◦ Other service manual resources online : Fixya ◦ eServiceinfo