Service Manuals, User Guides, Schematic Diagrams or docs for : . Car Manuals Toyota Celica 1988-1989.1993-1994.2000 Approved Toyota Celica 2000 Toyota Celica 2000 Service Manual Engine ARTICLE_FUEL_PUMP_REPLACEMENT
<< Back | HomeMost service manuals and schematics are PDF files, so You will need Adobre Acrobat Reader to view : Acrobat Download Some of the files are DjVu format. Readers and resources available here : DjVu Resources
For the compressed files, most common are zip and rar. Please, extract files with Your favorite compression software ( WinZip, WinRAR ... ) before viewing. If a document has multiple parts, You should download all, before extracting.
Good luck. Repair on Your own risk. Make sure You know what You are doing.
Image preview - the first page of the document
>> Download ARTICLE_FUEL_PUMP_REPLACEMENT documenatation <<
Text preview - extract from the document
2000 Toyota Celica GT -S L4-1762cc 1.8L DOHC MFI - Removal and Installation       Page 1 of 5

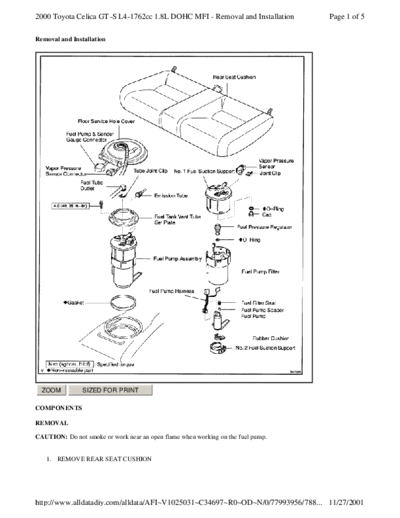
Removal and Installation


  ZOOM          SIZED FOR PRINT

COMPONENTS

REMOVAL

CAUTION: Do not smoke or work near an open flame when working on the fuel pump.


   1. REMOVE REAR SEAT CUSHION


http://www.alldatadiy.com/alldata/AFI~V1025031~C34697~R0~OD~N/0/77993956/788... 11/27/2001
2000 Toyota Celica GT -S L4-1762cc 1.8L DOHC MFI - Removal and Installation          Page 2 of 5


   2. REMOVE FLOOR SERVICE HOLE COVER

   3. DISCONNECT FUEL PUMP & SENDER GAUGE CONNECTOR AND VAPOR PRESSURE SENSOR
      CONNECTOR

   4. DISCONNECT FUEL TUBE AND EMISSION TUBE


 ZOOM            SIZED FOR PRINT


  a.   Wash away the mud, dust and the likes on the fuel suction plate with water.
  b.   Pull off the tube joint clip from the No.1 fuel suction plate.
  c.   Disconnect the fuel tube from the fuel pump assembly.
  d.   Disconnect the emission tube from the fuel pump assembly.


 ZOOM            SIZED FOR PRINT


  e.   Attach the tape in order to protect the port portion from the dust.


http://www.alldatadiy.com/alldata/AFI~V1025031~C34697~R0~OD~N/0/77993956/788... 11/27/2001
2000 Toyota Celica GT -S L4-1762cc 1.8L DOHC MFI - Removal and Installation                                   Page 3 of 5


 ZOOM             SIZED FOR PRINT


  f. Protect the disconnected fuel tube from damage and foreign material by covering it with a plastic bag.


   5. REMOVE FUEL PUMP ASSEMBLY FROM FUEL TANK


 ZOOM             SIZED FOR PRINT


  a.   Remove the 8 bolts and fuel tank vent tube set plate.
  b.   Pull out the fuel pump assembly. NOTE:
◦ Jabse Service Manual Search 2026 ◦ Jabse Pravopis ◦ onTap.bg ◦ Other service manual resources online : Fixya ◦ eServiceinfo