Service Manuals, User Guides, Schematic Diagrams or docs for : . Car Manuals Toyota Celica 1988-1989.1993-1994.2000 Approved Toyota Celica 2000 Toyota Celica 2000 Service Manual Technical Service Bulletins TSB_SUNROOF_SEPARATION
<< Back | HomeMost service manuals and schematics are PDF files, so You will need Adobre Acrobat Reader to view : Acrobat Download Some of the files are DjVu format. Readers and resources available here : DjVu Resources
For the compressed files, most common are zip and rar. Please, extract files with Your favorite compression software ( WinZip, WinRAR ... ) before viewing. If a document has multiple parts, You should download all, before extracting.
Good luck. Repair on Your own risk. Make sure You know what You are doing.
Image preview - the first page of the document
>> Download TSB_SUNROOF_SEPARATION documenatation <<
Text preview - extract from the document
Page 1 of 4
Sunroof - Noises/Separation/Difficult Operation
BODY
BO024-00

Title:
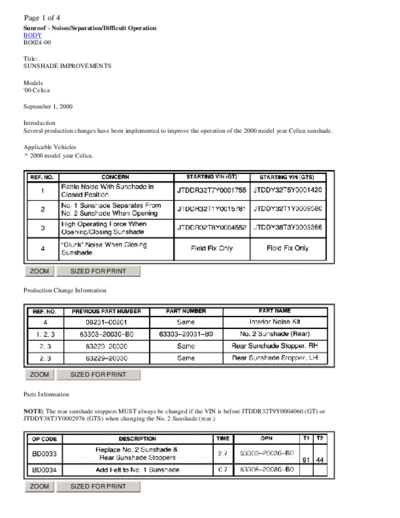
SUNSHADE IMPROVEMENTS

Models
'00 Celica

September 1, 2000

Introduction
Several production changes have been implemented to improve the operation of the 2000 model year Celica sunshade.

Applicable Vehicles
^ 2000 model year Celica.


  ZOOM              SIZED FOR PRINT


Production Change Information


  ZOOM              SIZED FOR PRINT


Parts Information

NOTE: The rear sunshade stoppers MUST always be changed if the VIN is before JTDDR32T9Y0004060 (GT) or
JTDDY38T3Y0002976 (GTS) when changing the No. 2 Sunshade (rear.)


  ZOOM              SIZED FOR PRINT
Page 2 of 4

Warranty Information

Applicable warranty*:
This repair is covered under the Toyota Basic Warranty. This warranty is in effect for 36 months or 36,000 miles, whichever occurs
first, from the vehicle's in-service date.

* Warranty application is limited to correction of a problem based upon a customer's specific complaint.

Repair Procedure

1. Rattle Noise With Sunshade in Closed Position


  ZOOM             SIZED FOR PRINT


Improvement:
A change was made to the shape of the protrusions located at the left and right rear corners of the No.2 sunshade, as shown in the
illustration above.

To eliminate a rattle noise when the sunshade is in a closed position:

A. Remove the headliner (please refer to the 2000 Celica Repair Manual, pages BO-88 through BO -90).
B. Remove the sliding roof assembly (please refer the the 2000 Celica Repair Manual, page BO-71).
C. Remove the rear sunshade stoppers.
D. Replace the No. 2 sunshade.
E. Replace the rear sunshade stoppers.
F. Reassemble in the reverse order of disassembly.


  ZOOM             SIZED FOR PRINT


2. No. 1 Sunshade Separates From No.2 Sunshade When Opening
Page 3 of 4
  Improvement:
  The shapes of the No. 2 sunshade and the rear sunshade stoppers have been changed.

  To minimize the possibility of sunshade separation:

  A.   Remove the headliner (please refer to the 2000 Celica Repair Manual, pages BO-88 through BO -90).
  B.   Remove the sliding roof assembly (please refer the the 2000 Celica Repair Manual, page BO-71).
  C.   Remove the rear sunshade stoppers.
  D.   Replace the No. 2 sunshade.
  E.   Replace the rear sunshade stoppers.
  F.   Reassemble in the reverse order of disassembly.


 ZOOM            SIZED FOR PRINT


3. High Operating Force When Opening/Closing Sunshade

  Improvement:
  The shapes of the No. 2 sunshade and the rear sunshade stoppers has been changed to reduce high operating force when
  opening/closing the sunshade.

  To reduce high operating force when opening/closing the sunshade;

  A.   Remove the headliner (please refer to the 2000 Celica Repair Manual, pages BO-88 through BO -90).
  B.   Remove the sliding roof assembly (please refer the the 2000 Celica Repair Manual, page BO-71).
  C.   Remove the rear sunshade stoppers.
  D.   Replace the No. 2 sunshade.
  E.   Replace the rear sunshade stoppers.
  F.   Reassemble in the reverse order of disassembly.


 ZOOM            SIZED FOR PRINT
Page 4 of 4
4. "Clunk" Noise When Closing Sunshade

  Improvement:
  Fell was added to the upper surface of the No. 1 sunshade to reduce a "clunk" noise when the No. 2 sunshade is pulled forward by
  the No. 1 sunshade.

  To reduce a "clunk" noise when closing the sunshade:

   A. Remove the sliding roof panel (please refer to TSB No. B0007-00).
   B. Release the spring between the No. 1 and No. 2 sunshades on both sides (please refer to TSB No. B0007-00).


 ZOOM            SIZED FOR PRINT


C. Cut two pieces of felt in the following dimensions:
D. Fit felt pieces to the No. 1 sunshade as shown above.
E. Reassemble in the reverse order of disassembly.
◦ Jabse Service Manual Search 2026 ◦ Jabse Pravopis ◦ onTap.bg ◦ Other service manual resources online : Fixya ◦ eServiceinfo