Service Manuals, User Guides, Schematic Diagrams or docs for : . Car Manuals Toyota Celica 1988-1989.1993-1994.2000 Approved Toyota Celica 2000 Toyota Celica 2000 Service Manual Technical Service Bulletins TSB_rattle_noise_repair
<< Back | HomeMost service manuals and schematics are PDF files, so You will need Adobre Acrobat Reader to view : Acrobat Download Some of the files are DjVu format. Readers and resources available here : DjVu Resources
For the compressed files, most common are zip and rar. Please, extract files with Your favorite compression software ( WinZip, WinRAR ... ) before viewing. If a document has multiple parts, You should download all, before extracting.
Good luck. Repair on Your own risk. Make sure You know what You are doing.
Image preview - the first page of the document
>> Download TSB_rattle_noise_repair documenatation <<
Text preview - extract from the document
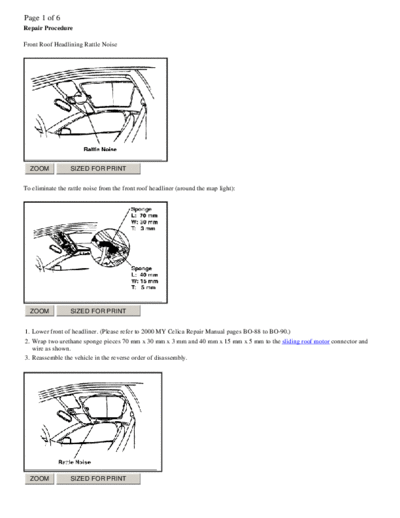
Page 1 of 6
Repair Procedure

Front Roof Headlining Rattle Noise


  ZOOM            SIZED FOR PRINT


To eliminate the rattle noise from the front roof headliner (around the map light):


  ZOOM            SIZED FOR PRINT


1. Lower front of headliner. (Please refer to 2000 MY Celica Repair Manual pages BO-88 to BO-90.)
2. Wrap two urethane sponge pieces 70 mm x 30 mm x 3 mm and 40 mm x 15 mm x 5 mm to the sliding roof motor connector and
   wire as shown.
3. Reassemble the vehicle in the reverse order of disassembly.


  ZOOM            SIZED FOR PRINT
Page 2 of 6
Sliding Roof Rattle Noise

To eliminate the rattle noise from the sliding roof area:


  ZOOM            SIZED FOR PRINT


1. Remove sliding roof glass.
2. Remove 7 clips on the sliding roof glass.
3. Make and install felt washers (ID: 7 mm, OD: 14 mm, Thickness: 0.5 mm) under clips or replace all 7 clips with part number
   90467-07152-CO as shown.


  ZOOM            SIZED FOR PRINT


Back Door Front Left Area Rattle Noise

To eliminate the rattle noise from the back door front left area:
Page 3 of 6
  ZOOM            SIZED FOR PRINT


Wrap a urethane sponge piece 40 mm x 10 mm x 2 mm to the center stop light connector as shown.


  ZOOM            SIZED FOR PRINT


Back Door Trim Rattle Noise

To eliminate the rattle noise from the back door trim:

1. Remove back door trim.


  ZOOM            SIZED FOR PRINT


  ZOOM            SIZED FOR PRINT


2. Add 8 pieces of felt (see table) to the back door trim as shown.
Page 4 of 6
                       L:            W:            T:
   Felt   1            32mm          1Omm          1mm
   Felt   2            35mm          1Omm          1mm
   Felt   3            33mm          19mm          1mm
   Felt   4            115mm         1Omm          1mm


  ZOOM            SIZED FOR PRINT


Package Tray Trim Rattle Noise

To eliminate the rattle noise from the package tray:


  ZOOM            SIZED FOR PRINT


  ZOOM            SIZED FOR PRINT
Page 5 of 6
Add felt to the package tray trim until there is no clearance between back door trim and stopper of the package tray trim as shown.


  ZOOM           SIZED FOR PRINT


Luggage Compartment Rattle Noise around Tie-down Hook (for vehicles without Deck Floor Box)

To eliminate the rattle noise from the tie - down hook in the luggage compartment:


  ZOOM           SIZED FOR PRINT


Tap the head of the tie-down hook bolts lightly with a rubber hammer.


  ZOOM           SIZED FOR PRINT


Buzz Noise from Instrument Panel
(Hood Lock Control Cable)
Page 6 of 6
To eliminate the buzz noise from the left side instrument panel:


  ZOOM            SIZED FOR PRINT


1. Pull the outer casing of the hood lock control cable as shown until the stopper bottoms on the grommet.


  ZOOM            SIZED FOR PRINT


2. Add tape to the cable housing as shown to prevent cable from being pulled back.
◦ Jabse Service Manual Search 2026 ◦ Jabse Pravopis ◦ onTap.bg ◦ Other service manual resources online : Fixya ◦ eServiceinfo