Service Manuals, User Guides, Schematic Diagrams or docs for : . Car Manuals Toyota Celica 1988-1989.1993-1994.2000 Approved Toyota Celica 2000 Toyota Celica 2000 Service Manual Transmission ARTICLE_TRANNY_AUTO_REASSEMBLE_PART3
<< Back | HomeMost service manuals and schematics are PDF files, so You will need Adobre Acrobat Reader to view : Acrobat Download Some of the files are DjVu format. Readers and resources available here : DjVu Resources
For the compressed files, most common are zip and rar. Please, extract files with Your favorite compression software ( WinZip, WinRAR ... ) before viewing. If a document has multiple parts, You should download all, before extracting.
Good luck. Repair on Your own risk. Make sure You know what You are doing.
Image preview - the first page of the document
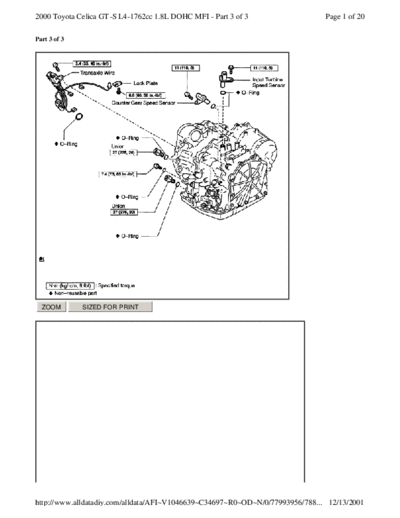
>> Download ARTICLE_TRANNY_AUTO_REASSEMBLE_PART3 documenatation <<
Text preview - extract from the document
2000 Toyota Celica GT -S L4-1762cc 1.8L DOHC MFI - Part 3 of 3                 Page 1 of 20

Part 3 of 3


  ZOOM        SIZED FOR PRINT


http://www.alldatadiy.com/alldata/AFI~V1046639~C34697~R0~OD~N/0/77993956/788... 12/13/2001
2000 Toyota Celica GT -S L4-1762cc 1.8L DOHC MFI - Part 3 of 3                 Page 2 of 20


 ZOOM        SIZED FOR PRINT


http://www.alldatadiy.com/alldata/AFI~V1046639~C34697~R0~OD~N/0/77993956/788... 12/13/2001
2000 Toyota Celica GT -S L4-1762cc 1.8L DOHC MFI - Part 3 of 3                 Page 3 of 20


 ZOOM        SIZED FOR PRINT


http://www.alldatadiy.com/alldata/AFI~V1046639~C34697~R0~OD~N/0/77993956/788... 12/13/2001
2000 Toyota Celica GT -S L4-1762cc 1.8L DOHC MFI - Part 3 of 3                 Page 4 of 20


 ZOOM        SIZED FOR PRINT


http://www.alldatadiy.com/alldata/AFI~V1046639~C34697~R0~OD~N/0/77993956/788... 12/13/2001
2000 Toyota Celica GT -S L4-1762cc 1.8L DOHC MFI - Part 3 of 3                 Page 5 of 20


 ZOOM        SIZED FOR PRINT


http://www.alldatadiy.com/alldata/AFI~V1046639~C34697~R0~OD~N/0/77993956/788... 12/13/2001
2000 Toyota Celica GT -S L4-1762cc 1.8L DOHC MFI - Part 3 of 3                                              Page 6 of 20


 ZOOM            SIZED FOR PRINT


REASSEMBLY

NOTICE:

   l   The automatic transaxle is composed of highly precision-finished parts, necessitating careful inspection before
       reassembly because even a small nick could cause fluid leakage or affect the performance. The instructions here are
       organized so that you will work on only one component group at a time. This will help avoid confusion from similar-
       looking parts of different sub -assemblies being on your workbench at the same time. The component groups are


http://www.alldatadiy.com/alldata/AFI~V1046639~C34697~R0~OD~N/0/77993956/788... 12/13/2001
2000 Toyota Celica GT -S L4-1762cc 1.8L DOHC MFI - Part 3 of 3                                                    Page 7 of 20

        inspected and repaired from the converter housing side. As much as possible, complete the inspection, repair and
        reassembly before proceeding to the next component group. If a defect is found in a certain component group during
        reassembly, inspect and repair this group immediately. If a component group cannot be assembled because parts are
        being ordered, be sure to keep all parts of that group in a separate container while proceeding with disassembly,
        inspection, repair and reassembly of other component groups. Recommended ATF: TYPE T-IV or equivalent
    l   All disassembled parts should be washed clean and any fluid passages and holes should be blown through with
        compressed air.
    l   Dry all parts with compressed air-never use shop rags.
    l   When using compressed air, always aim away from yourself to prevent accidentally spraying ATF or kerosene on
        your face.
    l   The recommended automatic transaxle fluid or kerosene should be used for cleaning.
    l   After cleaning, the parts should be arranged in the correct order for efficient inspection, repairs, and reassembly.
    l   When disassembling a valve body, be sure to match each valve together with the corresponding spring..
    l   New discs for the brakes and clutches that are to be used for replacement must be soaked in ATF for at least 15
        minutes before reassembly.
    l   All oil seal rings, clutch discs, clutch plates, rotating parts, and sliding surfaces should be coated with ATF prior to
        reassembly.
    l   All gaskets and rubber O-rings should be replaced.
    l   Do not apply adhesive cements to gaskets and similar parts.
    l   Make sure that the ends of a snap ring are not aligned with one of the cutouts and are installed in the groove correctly.
    l   If a worn bushing is to be replaced, the sub -assembly containing the bushing must also be replaced.
    l   Check thrust bearings and races for wear or damage. Replace if necessary. Use petroleum jelly to keep parts in place.
    l   When working with Formed In Place Gasket (FIPG) material, you must observe the following: Using a razor blade
        and a gasket scraper, remove all of the old packing from the gasket surface.

Thoroughly clean all components to remove all of the loose material. Clean both sealing surfaces with a non -residue solvent.
Parts must be reassembled within 10 minutes of application. Otherwise, the packing Formed In Place Gasket (FIPG) material
must be removed and reapplied.


  ZOOM            SIZED FOR PRINT


  30. INSTALL DIFFERENTIAL ASSEMBLY
  31. INSTALL TRANSAXLE HOUSING


  ZOOM            SIZED FOR PRINT


http://www.alldatadiy.com/alldata/AFI~V1046639~C34697~R0~OD~N/0/77993956/788... 12/13/2001
2000 Toyota Celica GT -S L4-1762cc 1.8L DOHC MFI - Part 3 of 3                                                Page 8 of 20


  a.   Calculate the end play value using the following formula and values of Dimension D and E that were measured when
       installing cylindrical roller bearing and U/D planetary gear. Select an appropriate U/D planetary gear thrust bearing
       race No.2 which satisfies the specified end play value, and install it. End play: 0.198 - 0.693 mm (0.0078 - 0.0273
       inch) HINT: End play = Dimension E - Dimension D - Thrust bearing thickness 3.28 mm (0.1291 inch) - U/D gear
       thrust bearing race No.2 thickness


  ZOOM           SIZED FOR PRINT


Race thickness: mm (inch)


  ZOOM           SIZED FOR PRINT


Bearing and bearing race diameter: mm (inch)


  ZOOM           SIZED FOR PRINT


  b.   Install the oil pump and 7 bolts to the transaxle case Torque: 22 Nm (226 kgf-cm, 16 ft. lbs.)


  ZOOM           SIZED FOR PRINT


http://www.alldatadiy.com/alldata/AFI~V1046639~C34697~R0~OD~N/0/77993956/788... 12/13/2001
2000 Toyota Celica GT -S L4-1762cc 1.8L DOHC MFI - Part 3 of 3                                                 Page 9 of 20


  c.   Coat on O-ring of oil pump with ATF.


 ZOOM            SIZED FOR PRINT


  d.   Remove any packing material and be careful not to get oil on the contacting surfaces of the transaxle case or transaxle
       housing.
  e.   Apply FIPG to the transaxle case. FIPG: Part No. 08826-00090, THREE BOND 1281 or equivalent


 ZOOM            SIZED FOR PRINT


  f. Install the transaxle housing and 16 bolts to the transaxle case. Torque: Bolt A: 22 Nm (226 kgf-cm, 16 ft. lbs.) Bolt
     B and C: 29 Nm (300 kgf-cm, 22 ft. lbs.) HINT: Apply seal packing or equivalent to the bolt A. Seal packing:
     THREE BOND 2403 or equivalent Bolt length: Bolt A: 50 mm (1.969 inch) Bolt B: 50 mm (1.969 inch) Bolt C: 42
     mm (1.654 inch) NOTICE: Because the bolt A is a seal bolt, apply the seal packing to new bolts and tighten them
     within 10 minutes after application.


 ZOOM            SIZED FOR PRINT


 32. INSPECT INPUT SHAFT END PLAY Using a dial indicator, measure the input shaft end play. End play: 0.27 - 1.24


http://www.alldatadiy.com/alldata/AFI~V1046639~C34697~R0~OD~N/0/77993956/788... 12/13/2001
2000 Toyota Celica GT -S L4-1762cc 1.8L DOHC MFI - Part 3 of 3                Page 10 of 20

     mm (0.0106 - 0.0417 inch)
 33. CHECK DIFFERENTIAL PRELOAD (See page AX-107)


 ZOOM             SIZED FOR PRINT


 34. PLACE TRANSAXLE HOUSING
 35. INSTALL MANUAL VALVE LEVER SHAFT


 ZOOM             SIZED FOR PRINT


  a.   Coat the new oil seal with ATF.
  b.   Install the oil seal to the transaxle case.


 ZOOM             SIZED FOR PRINT


  c.   Install the parking lock rod to the manual valve lever.


http://www.alldatadiy.com/alldata/AFI~V1046639~C34697~R0~OD~N/0/77993956/788... 12/13/2001
2000 Toyota Celica GT -S L4-1762cc 1.8L DOHC MFI - Part 3 of 3                                                 Page 11 of 20


 ZOOM            SIZED FOR PRINT


  d.   Install a new spacer and manual valve lever shaft to the transaxle case.


 ZOOM            SIZED FOR PRINT


  e.   Using a pin punch and a hammer, drive in a new pin.


 ZOOM            SIZED FOR PRINT


  f. Turn the spacer and the lever shaft to alight the small hole for locating the staking position in the spacer with the
     staking position mark on the lever shaft.
  g. Using a pin punch, stake the spacer through the small hole.
  h. Check that the spacer does not turn.


http://www.alldatadiy.com/alldata/AFI~V1046639~C34697~R0~OD~N/0/77993956/788... 12/13/2001
2000 Toyota Celica GT -S L4-1762cc 1.8L DOHC MFI - Part 3 of 3                                              Page 12 of 20


 ZOOM            SIZED FOR PRINT


  i.   Using needle-nose pliers, install the return spring.


 ZOOM            SIZED FOR PRINT


  j.   Install the parking lock pawl bracket with 2 bolts. Torque: 20 Nm (205 kgf-cm, 15 ft. lbs.) Bolt length: 25 mm (0.984
       inch)


 ZOOM            SIZED FOR PRINT


  k.   Install the manual detent spring with 2 bolts. NOTICE: Make sure to install the manual detent spring and cover in
       this order. Torque: Bolt A: 20 Nm (205 kgf-cm, 15 ft. lbs.) Bolt B: 12 Nm (120 kgf-cm, 9 ft. lbs.) Bolt length: Bolt
       A: 27 mm (1.063 inch) Bolt B: 16 mm (0.630 inch)


http://www.alldatadiy.com/alldata/AFI~V1046639~C34697~R0~OD~N/0/77993956/788... 12/13/2001
2000 Toyota Celica GT -S L4-1762cc 1.8L DOHC MFI - Part 3 of 3                                    Page 13 of 20


  ZOOM          SIZED FOR PRINT


 36. INSTALL ACCUMULATOR PISTONS AND SPRINGS

         a.   Coat new 4 O-rings with ATF and install them to the pistons.
         b.   Coat the 4 springs and 3 accumulator pistons with ATF, install them to the holes.


  ZOOM          SIZED FOR PRINT


Accumulator spring:


http://www.alldatadiy.com/alldata/AFI~V1046639~C34697~R0~OD~N/0/77993956/788... 12/13/2001
2000 Toyota Celica GT -S L4-1762cc 1.8L DOHC MFI - Part 3 of 3                             Page 14 of 20


 ZOOM            SIZED FOR PRINT


 37. INSTALL CHECK BALL BODY AND SPRING
 38. INSTALL TRANSAXLE SOLENOID WIRE


 ZOOM            SIZED FOR PRINT


  a.   Coat a new O-ring with ATF, install it to the transaxle solenoid wire.


 ZOOM            SIZED FOR PRINT


  b.   Install the solenoid wire retaining bolt Torque: 5.4 Nm (55 kgf-cm, 48 inch lbs.)


http://www.alldatadiy.com/alldata/AFI~V1046639~C34697~R0~OD~N/0/77993956/788... 12/13/2001
2000 Toyota Celica GT -S L4-1762cc 1.8L DOHC MFI - Part 3 of 3                                                  Page 15 of 20


  ZOOM            SIZED FOR PRINT


  39. INSTALL APPLY GASKET

          a.   Coat 4 apply gaskets with ATF and install them to the transaxle case.


  ZOOM            SIZED FOR PRINT


  40. INSTALL VALVE BODY ASSEMBLY

          a.   Align the groove of the manual valve with the pin of lever.
          b.   Install the 17 bolts. Torque: 11 Nm (110 kgf-cm, 8 ft. lbs.) NOTICE:
◦ Jabse Service Manual Search 2026 ◦ Jabse Pravopis ◦ onTap.bg ◦ Other service manual resources online : Fixya ◦ eServiceinfo