Service Manuals, User Guides, Schematic Diagrams or docs for : . Car Manuals Toyota Sienna 2004-2007 Approved SRM 46 bodypane frontdoo
<< Back | HomeMost service manuals and schematics are PDF files, so You will need Adobre Acrobat Reader to view : Acrobat Download Some of the files are DjVu format. Readers and resources available here : DjVu Resources
For the compressed files, most common are zip and rar. Please, extract files with Your favorite compression software ( WinZip, WinRAR ... ) before viewing. If a document has multiple parts, You should download all, before extracting.
Good luck. Repair on Your own risk. Make sure You know what You are doing.
Image preview - the first page of the document
>> Download frontdoo documenatation <<
Text preview - extract from the document
BP-32                                    BODY PANEL REPLACEMENT


 FRONT DOOR OUTER PANEL (ASSY)
 REPLACEMENT


                                                                                                               F14983-A

 REMOVAL


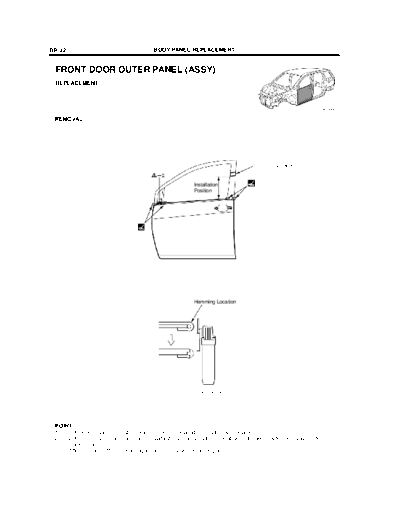
                                                                                   Positioning Tape


                                                          Installation
                                                          Position


                                                          Hemming Location


                                                          Disk Sander


                                                                                                                F14983

 POINT
 1   Before removing the outer panel, mark the installation position with a tape.
 2   Before removing the outer panel, establish its exact position in relation to the window frame using a reference
     marker, etc.
 3   After grinding off the hemming location, remove the outer panel.
                                         BODY PANEL REPLACEMENT                                                 BP-33


INSTALLATION
S Temporarily install the new parts and measure each part of the new parts in accordance with the body dimension
  diagram. (See the body dimension diagram)
S Inspect the fitting of the related parts around the new parts before welding. This affects the appearance of the
  finish.
S After welding, apply the polyurethane foam to the corresponding parts.
S After welding, apply body sealer and under-coating to the corresponding parts.
S After applying the top coat layer, apply anti-rust agent to the inside of the necked section structural weld spots.


                                                     Positioning Tape


                          Installation
                          Position


                                                                                                   Do not close the
                                                                                                   drain hole.


                                                                                                   Cloth Tape


                                                                                         Hemming Tool


                                                                                                                 F14984

POINT
1   Before temporarily installing the new parts, apply body sealer to the reinforcement, side impact protection
    beam and back side of the new parts.
    HINT:
    1) Apply sealer evenly about 10mm (0.39in.) from the flange and 3mm (0.12in.) in diameter to the outer
         panel and apply just enough sealer for the reinforcement and side impact protection beam to make con-
         tact.
2   Bend the flange hem about 30_ with a hammer and dolly, then fasten tightly with a hemming tool.
    HINT:
    1) Perform hemming in three steps, being careful not to warp the panel.
    2) If a hemming tool cannot be used, hem with a hammer and dolly.
◦ Jabse Service Manual Search 2026 ◦ Jabse Pravopis ◦ onTap.bg ◦ Other service manual resources online : Fixya ◦ eServiceinfo