Service Manuals, User Guides, Schematic Diagrams or docs for : . Car Manuals Toyota Sienna 2004-2007 Approved SRM 40 20v7d x040001
<< Back | HomeMost service manuals and schematics are PDF files, so You will need Adobre Acrobat Reader to view : Acrobat Download Some of the files are DjVu format. Readers and resources available here : DjVu Resources
For the compressed files, most common are zip and rar. Please, extract files with Your favorite compression software ( WinZip, WinRAR ... ) before viewing. If a document has multiple parts, You should download all, before extracting.
Good luck. Repair on Your own risk. Make sure You know what You are doing.
Image preview - the first page of the document
>> Download x040001 documenatation <<
Text preview - extract from the document
                                                                                                             76-27
                                      EXTERIOR/INTERIOR TRIM   -   ROOF HEADLINING ASSY
                                                                                                              760VC-02


REPLACEMENT
HINT:
S       The installation is in the reverse order of the removal. However, when there is a special point concern-
        ing the installation, it is indicated.
S       On the LH side, use the same procedures as on the RH side.


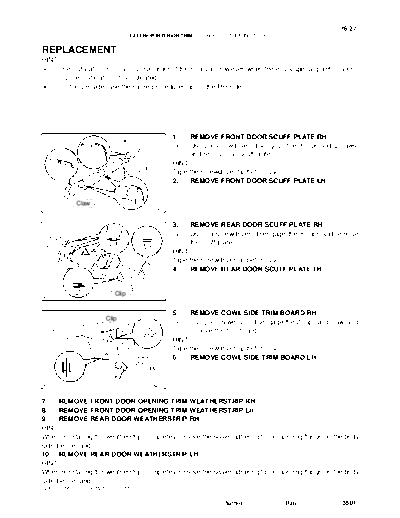
                                                      1.    REMOVE FRONT DOOR SCUFF PLATE RH
                               Clip
                                                      (a)   Using a screwdriver, disengage the 3 clips and 2 claws,
                                                            and remove the scuff plate.
                                                      HINT:
                                                      Tape the screwdriver tip before use.
                                                      2.    REMOVE FRONT DOOR SCUFF PLATE LH


              Claw
                                             B66491


                                                      3.    REMOVE REAR DOOR SCUFF PLATE RH
                                                      (a)   Using a screwdriver, disengage the 8 clips and remove
                                                            the scuff plate.
                                                      HINT:
                                                      Tape the screwdriver tip before use.
                                                      4.    REMOVE REAR DOOR SCUFF PLATE LH


                           Clip              B66493


                                                      5.    REMOVE COWL SIDE TRIM BOARD RH
                        Clip
                                                      (a)   Using a screwdriver, disengage the 2 clips and claw, and
                                                            remove the trim board.
                                                      HINT:
                                                      Tape the screwdriver tip before use.
                                                      6.    REMOVE COWL SIDE TRIM BOARD LH
                                          Claw

                                             B69503


7.    REMOVE FRONT DOOR OPENING TRIM WEATHERSTRIP RH
8.    REMOVE FRONT DOOR OPENING TRIM WEATHERSTRIP LH
9.    REMOVE REAR DOOR WEATHERSTRIP RH
HINT:
When reinstalling the weatherstrip, completely remove the sealer adhering to the opening flange on the body
side beforehand.
10. REMOVE REAR DOOR WEATHERSTRIP LH
HINT:
When reinstalling the weatherstrip, completely remove the sealer adhering to the opening flange on the body
side beforehand.
2005 SIENNA REPAIR MANUAL (RM1163U)

                                                                         Author :          Date :             3501
76-28
                              EXTERIOR/INTERIOR TRIM   -   ROOF HEADLINING ASSY

                                               11.   REMOVE CENTER PILLAR GARNISH LOWER RH
                                               (a)   Remove the floor anchor cover.
                                               (b)   Remove the bolt and disconnect the front seat outer belt
                                                     on the floor anchor side.


                                      B66509


                                               (c)   Using a screwdriver, disengage the 5 clips and remove
                                                     the pillar garnish.
                                               HINT:
        Clip                                   Tape the screwdriver tip before use.
                                               (d) w/ power slide door:
                                                     Disconnect the power slide door control switch RH con-
                                                     nector.
                                               12. REMOVE CENTER PILLAR GARNISH LOWER LH
                                      B66496


                                               13. REMOVE CENTER PILLAR GARNISH UPPER RH
                                               (a) Using a screwdriver, disengage the assist grip plugs.
                                               HINT:
                                               Tape the screwdriver tip before use.
                                               (b) Remove the 2 torx
◦ Jabse Service Manual Search 2026 ◦ Jabse Pravopis ◦ onTap.bg ◦ Other service manual resources online : Fixya ◦ eServiceinfo