Service Manuals, User Guides, Schematic Diagrams or docs for : . Car Manuals Toyota Tacoma 1995-2000 Approved service repair manuals 98-00 Trailer Towing Converter Box Replacement Campaign Converter Installation Reg Cab
<< Back | HomeMost service manuals and schematics are PDF files, so You will need Adobre Acrobat Reader to view : Acrobat Download Some of the files are DjVu format. Readers and resources available here : DjVu Resources
For the compressed files, most common are zip and rar. Please, extract files with Your favorite compression software ( WinZip, WinRAR ... ) before viewing. If a document has multiple parts, You should download all, before extracting.
Good luck. Repair on Your own risk. Make sure You know what You are doing.
Image preview - the first page of the document
>> Download Converter Installation Reg Cab documenatation <<
Text preview - extract from the document
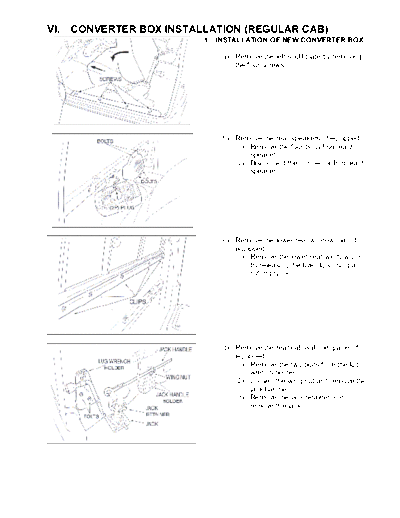
VI.   CONVERTER BOX INSTALLATION (REGULAR CAB)
                          1. INSTALLATION OF NEW CONVERTER BOX

                             (a) Remove the left scuff plate by removing
                                 the four screws.


                             (b) Remove the rear speakers (if equipped)
                                 (1) Remove the four bolts from each
                                     speaker.
                                 (2) Disconnect the connector from each
                                     speaker.


                             (c) Remove the lower rear window trim (if
                                 equipped).
                                 (1) Remove the lower rear window trim
                                     by releasing the five clips using a
                                     nylon pry tool.


                             (d) Remove the rear cab wall trim panel (if
                                 equipped).
                                 (1) Remove the two bolts from the lug
                                     wrench holder.
                                 (2) Loosen the wing nut and remove the
                                     jack handle.
                                 (3) Remove the jack retainer and
                                     remove the jack.
     (e) Remove the rear wall trim panel and
         grommet.
         (1) Remove the four retaining clips and
             remove the trim panel.


           (2) Remove the grommet in the lower
               left corner.


     (f)   Remove jack handle (vehicles without
           rear wall trim panel).
           (1) Remove the wing nut and remove
               the jack handle.
           (2) Remove the grommet in the lower
               left corner.


     (g) Modify the rear wall trim panel (if
         equipped).
         (1) Cut out area as shown.

     NOTE:
     Panel is shown from the backside.


TACOMA                                         2
           (2) Cut packing tape as shown.

     NOTE:
        Do not cut the 80mm x 60mm piece of
        tape.


     (h) Surface preparation.
         (1) Clean surface in the area shown
             using a prep-solvent.
         (2) Attach a 25mm x 15mm piece of
             packing to the rear of the cab wall
             as shown.
         (3) Temporarily apply cloth tape to
             protect the vehicle sfinish as shown.


     (i)Bend the converter box mounting
        bracket.
        (1) Bend the top of the bracket as
            shown.
     NOTE:
        There should be a 1.5 2.0 mm gap
        on the bracket after bending.
        (2) Install the 80mm x 60mm packing
            around the mounting bracket as
            shown.


     (j) Mount the converter box.
         (1) Carefully slid the converter-
             mounting bracket between the rear
             cab wall ribs.
         (2) Hook the bent portion of the bracket
             onto the cab wall support brace.
     NOTE:
     Ensure that the converter bracket is fully
     seated on to the cab wall support.
         (3) Remove the protective paper from
             the converter box.
         (4) Firmly press the converter box to the
             rear cab wall.


TACOMA                                        3
         (5) Tighten the mounting bracket to the
             rear cab wall as shown.


     (k) Install the converter box harness.
         (1) Connect the 8-Pin and 2-Pin
              connectors of the converter box
              harness to the converter box.
         (2) Route the gray 4-Pin connector
              though the hole in the rear of the
              cab wall.
         (3) Install the grommet into the rear cab
              wall.
         (4) Route the 13-Pin connector harness
              forward between the seat belt
              anchor and the B-Pillar.


         (5) Release the carpet clips.
         (6) Unplug the 13-Pin connector located
             underneath the front driver s s
                                           eat.


         (7) Install the insulator block to the
              bottom of the 13-Pin male connector
              of the converter box harness.
         (8) Connect the two 13-Pin converter
              box harness connectors to the
              vehicle harness.
         (9) Route the converter box harness
              along the vehicle sharness.
         (10) Secure the insulator block to the
              floor of the cab as shown.


TACOMA                                        4
         (10) Secure the converter box harness to
              the vehicle sharness using the 5 tie-
              wraps as shown.


         (11) Secure the fuse section of the
              converter box harness to the rear
              cab wall as shown using the packing
              tape.
         (12) Loop and secure any excess wire
              using the packing tape as shown.


  1. REASSEMBLE THE INTERIOR

     (a) Reinstall the jack handle (vehicles
         without rear wall trim panel).
     (b) Reinstall the jack handle and tighten the
         wing nut.


     (a) Reinstall the rear cab wall trim panel (if
         equipped).
         (1) Reinstall the rear cab wall trim panel
             and engage the 4 clips.


TACOMA                                         5
     (d) Reinstall the jack and the jack retainer.
     (a) Reinstall the lug wrench holder using the
         two bolts.
     (b) Reinstall the jack handle and tighten the
         wing nut.


     (c) Reinstall the lower rear window trim (if
         equipped).
         (1) Reinstall the lower rear window trim
             by engaging the five clips.


     (g) Reinstall the rear speakers (if equipped)
         (1) Reconnect each speaker.
         (2) Reinstall the four bolts for each
             speaker.


     (h) Reinstall the carpet clips.
     (i) Reinstall the left scuff plate using the four
         screws.
     (j) Proceed to Section VIII.


TACOMA                                           6
◦ Jabse Service Manual Search 2026 ◦ Jabse Pravopis ◦ onTap.bg ◦ Other service manual resources online : Fixya ◦ eServiceinfo