Service Manuals, User Guides, Schematic Diagrams or docs for : . Rare and Ancient Equipment Riso TI ti-fr
<< Back | HomeMost service manuals and schematics are PDF files, so You will need Adobre Acrobat Reader to view : Acrobat Download Some of the files are DjVu format. Readers and resources available here : DjVu Resources
For the compressed files, most common are zip and rar. Please, extract files with Your favorite compression software ( WinZip, WinRAR ... ) before viewing. If a document has multiple parts, You should download all, before extracting.
Good luck. Repair on Your own risk. Make sure You know what You are doing.
Image preview - the first page of the document
>> Download ti-fr documenatation <<
Text preview - extract from the document
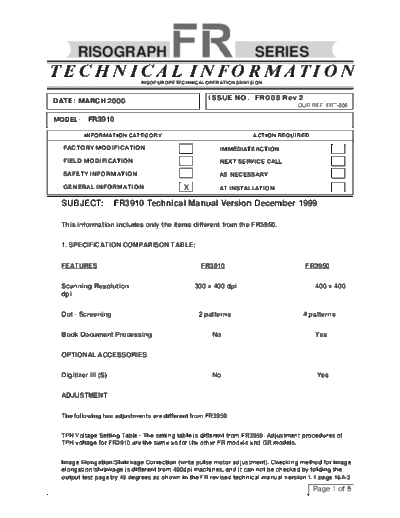
      RISOGRAPH                                                   SERIES
TECHNICAL INFORMATION       RISO EUROPE TECHNICAL OPERATIONS DIVISION


DATE: MARCH 2000                                   ISSUE NO. FR008 Rev 2
                                                                                 OUR REF: FRT-006

MODEL:     FR3910

         INFORMATION CATEGORY                                     ACTION REQUIRED

  FACTORY MODIFICATION                                IMMEDIATE ACTION
  FIELD MODIFICATION                                  NEXT SERVICE CALL
  SAFETY INFORMATION                                  AS NECESSARY
  GENERAL INFORMATION                     X           AT INSTALLATION

 SUBJECT:            FR3910 Technical Manual Version December 1999

 This information includes only the items different from the FR3950.

 1. SPECIFICATION COMPARISON TABLE;


 FEATURES                                       FR3910                              FR3950


 Scanning Resolution                          300 x 400 dpi                            400 x 400
 dpi


 Dot - Screening                               2 patterns                          4 patterns

 Book Document Processing                           No                                 Yes


 OPTIONAL ACCESSORIES

 Digitizer III (S)                                  No                                  Yes


 ADJUSTMENT

 The following two adjustments are different from FR3950


 TPH Voltage Setting Table - The setting table is different from FR3950. Adjustment procedures of
 TPH voltage for FR3910 are the same as for the other FR models and GR models.


 Image Elongation/Shrinkage Correction (write pulse motor adjustment). Checking method for image
 elongation/shrinkage is different from 400dpi machines, and it can not be checked by folding the
 output test page by 45 degrees as shown in the FR revised technical manual version 1.1 page 16A-3
                                                                                      Page 1 of 5
TECHNICALINFORMATION
                                                         RISOGRAPH                     SERIES
         ISSUE NO. FR008


1. Thermal Power of Thermal Print Head (FR3910)
    1. Trun off the power and remove Front right cover.                 Resistance     Voltage
    2. Connect a voltmeter between pins TP1(+) and TP2(GND) on          1403 to 1413    15.9
      the Power supply PCB.                                             1414 to 1431    16.0
    3. Turning ON Test mode No.77 (TPH/CTL signal), confirm that        1432 to 1449    16.1
                                                                        1450 to 1467    16.2
       the voltage displayed on the voltmeter conforms to the setting   1468 to 1485    16.3
      table according to the thermal print head resistance value.       1486 to 1503    16.4
    4. If not, adjust VR100/VR101 for Power supply PCBH and             1504 to 1522    16.5
       VR401/VR402 for Power supply PCBN. (VR101 or VR402:              1523 to 1540    16.6
                                                                        1541 to 1559    16.7
      Fine adjustment, VR100 or VR401: Rough adjustment.)               1560 to 1577    16.8
    5. On completion of adjustment, turn off the power and detach       1578 to 1596    16.9
       the voltmeter.                                                   1597 to 1615    17.0
                                                                        1616 to 1634    17.1
                                                                        1635 to 1653    17.2
                                                                        1654 to 1672    17.3
                                                                        1673 to 1692    17.4
2. Image Elongation / Shrinkage Correction                              1693 to 1711    17.5
     (Write Plus Moter Speed Adjustment)                                1712 to 1731    17.6
                                                                        1732 to 1750    17.7
   -Checking and method                                                 1751 to 1770    17.8
   1. Put the A3 size on the paper feed tray and run test print         1771 to 1790    17.9
      Test mode No.119.                                                 1791 to 1810    18.0
   2. Measure the length of 33 spans of sross strips vertically.        1811 to 1830    18.1
                                                                        1831 to 1850    18.2
      Check total width of 33 spans between 264 to 272 mm.              1851 to 1871    18.3
   3. If not, adjust Write plus motor speed by Test mode                1872 to 1891    18.4
      (Memory switch) No.221. And press PRINT POSSITION                 1892 to 1898    18.5
      button to select a Memory switch setting referring to FR
      Technical manual.


                                                                                  Page 2 of 5
CHAPTER 16. MASTER MAKING SECTION
ADJUSTMENT                    Test Mode                No.119 Thermal print head check operation 3
                                                       No.221 Image Elongation/Shrinkage correction(White pulse motor)


2.     Image Elongation/Shrinkage Correction (Write Pulse Motor Speed
       Adjustment)
       - Checking and Method
          1. Put the same size of the paper as the effective printing area on the Paper feed tray and run
             test print (Test Mode No. 119). (128 dots between line and line)
          2. Fold the output test print diagonally as shown below, and make sure that the main scan block
             and sub-scan block overlap properly.
             *FR 300 dpi machine
             Test Print "119" block image is rectangle on this machine. Each vertical and horizontal line
             does not cross with each other.
             Make sure to set 33 blocks in 270mm vertical length.
          3. If not overlapping, adjust a write pulse motor speed in Test Mode (Memory Switch) No. 221.
             Press the PRINT POSITION button to select a Memory switch setting referring to the chart
             below.
          4. Adjust image elongation/shrinkage so that it will be finally within
◦ Jabse Service Manual Search 2026 ◦ Jabse Pravopis ◦ onTap.bg ◦ Other service manual resources online : Fixya ◦ eServiceinfo